Mark Fuller guides us through everything you need to know about mastering double exposure:
A DOUBLE (or multiple) exposure is when two or more captures are combined into a single image. Although this creative technique is more popular with terrestrial photography, underwater it can produce some truly special results.
In the days of film, this effect was achieved by a lever disengaging the advance mechanism; allowing the shutter to re-cock without advancing the film, thus allowing repeated exposures on the same frame. These days, most DSLRs – and even some point-and-shoot cameras – have an image overlay and/or multiple exposure settings, providing a far less technical method of achieving the same affect. Check your user manual.
What you will need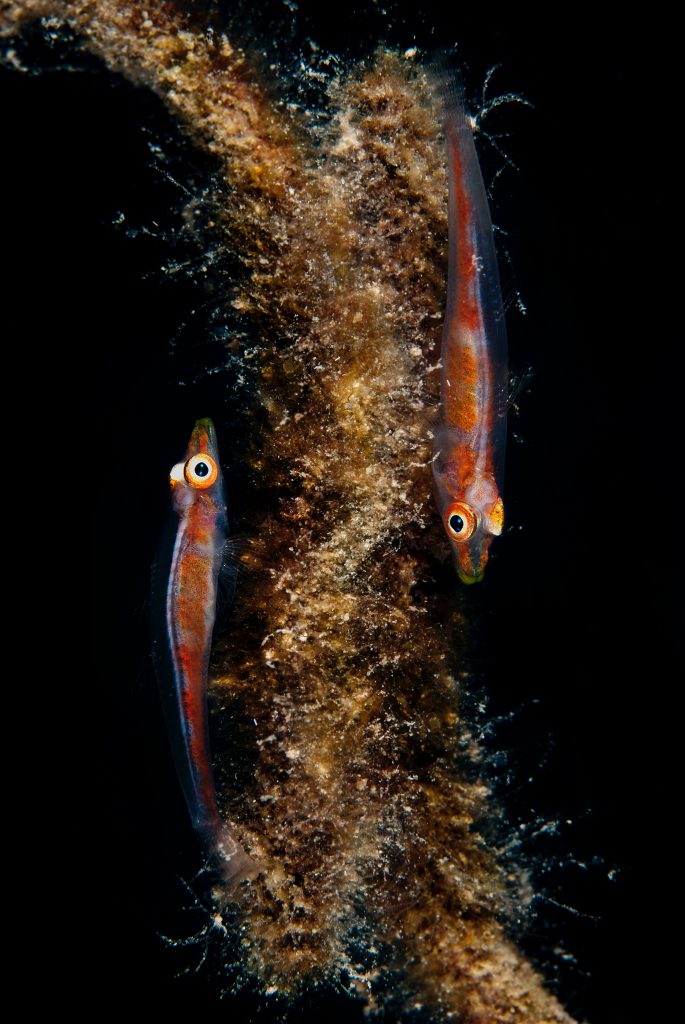
- A housed DSLR with at least one strobe. The specific image you have in mind will determine the best lens or lenses to use. For simplicity, you can assume that both macro and wide-angle lenses are used in double exposures, either using a unique lens for each exposure, or just sticking with a single lens.
- Accessories like a snoot or diopter can also be very helpful, as black backgrounds with minimal backscatter are ideal for creating double exposures.
Techniques
There are two popular techniques for double exposure – either two macro subjects, or the more orthodox macro foreground set in front of a wide-angle background. In both cases you will need to capture black backgrounds around the subject so the second exposure can be placed over the negative black space.
There are two key things to remember:
- High shutter speeds and small apertures are imperative in eliminating any natural light and providing the necessary black background.
- Planning is crucial in composing two images to work as one. I prefer activating the grid in the viewfinder so I know what lines not to cross.
Macro on Macro
This technique requires the use of your camera’s multiple exposure mode setting, which can be found in the menus, and both shots can be taken on the same dive. Some tips for getting it right:
- Exposure: Because the camera will be combining two images together there will be some light lost in the final image. I like to first test-shoot a single image until I am happy with the exposure and then slightly overexpose (maybe by 2/3 of an f-stop) when ready to attempt the double exposure.
- Settings: Maintaining exact focus is extremely important in keeping both the exposures sharp – make sure your auto focus is set up to manually change the point of focus. Additionally, make sure you are not shooting on continuous mode as you don’t want an extra frame sneaking in.
- Plan it: Taking double exposures can be time consuming and a missed second shot can be very frustrating. Therefore, make sure you plan your composition ahead of time.
- Composition: taking two consecutive shots of a goby on a whip coral side by side, composed in exactly the same way, will not produce a very interesting shot. Either move 180 degrees around the subject after the first capture and shoot the second frame, or if you are confident enough after moving 180 degrees, move the focus point to the opposite side and remember to also rotate the housing 180 degrees. This ensures that the two subjects’ heads will be facing each other and that corals will look more natural. The advantage of using this setting is that the raw files will automatically be combined to form a new raw file, so you can review your image right away and adjust your settings or composition as required.
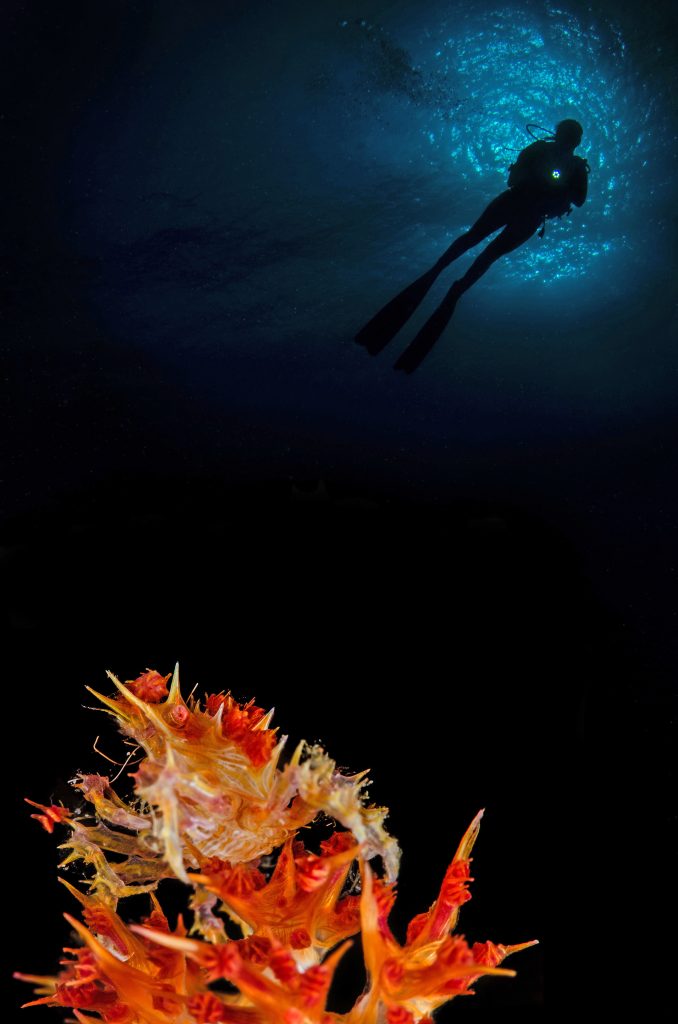
Macro on Wide Angle
This technique requires using two different lenses on two separate dives: one wide angle shot and one macro shot and overlaying the photos during the editing process. There are endless combinations, so get creative!
- SETTINGS: Instead of using your camera’s multiple exposure setting, you can use the image overlay setting, which lets you select the files to place over each other.
- BE PREPARED: You will need two images with black backgrounds. It doesn’t matter which image to start with, just remember that later you will be combining the image with one from another dive. Try shooting “dark” sunbursts to create a black negative space for the macro exposure, while keeping some interest in the wide-angle background.
- TOP TIP: A great way to always being ready for double exposure opportunities is to keep around 20 raw wide-angle files ready for double exposure on your memory card, so when you have a magical macro moment you can combine them together.
Moving Subjects
Once you get confident with the basics, it’s time to try shooting moving subjects. This can be difficult and needs a lot of practice and patience.
The best way to start is with a full frontal shot of the same subject. Move your focus point to the left half of the viewfinder, compose and shoot the subject, then move the focus point to the right side and shoot again, being careful not to overlap. Again this can be accomplished entirely using the double exposure setting on your camera.
This technique requires confidence in your skills and experience – your subjects won’t wait for you! You need to be thinking about exposures while moving around the subject, and planning your composition. It’s also important to remember to move your focus points and adjust your strobe position.
Double Exposures at Night
This is perhaps the most difficult technique of all, but you can make it easier on yourself.
- Use your buddy as a spotter and a lighting assistant. Discuss your plans in advance and prepare for any subject you may encounter. I make sure my dive buddy knows exactly what I want to shoot, and how I want to shoot it, so when a subject moves quickly, we’re both ready. Planning and teamwork can really pay off!
- Know your camera; adjusting it should be second nature in total darkness. The last thing you want is to be struggling to adjust your settings only to discover your subject is long gone by the time you look up.
There you have it! The options are endless, and so your potential creations are really only limited by your imagination.
This article feature in SD Through The Lens (Issue 9/2013)
You may also like