An inadvertently-engineered creation discovered by U.S. Department of Energy’s National Renewable Energy Laboratory (NREL) and the United Kingdom’s University of Portsmouth has caused a breakthrough in PETase, offering a vital solution to plastic pollution.
Ideonella sakaiensis, also known as PETase (PET-digesting enzyme), was first discovered in 2016 by Yoshida et al, who found the bacterium living in the soil at a recycling plant in Japan that was piled with used bottles. This bacterium was unique as it could use Polyethylene terephthalate (PET) as its major carbon and energy source. This means that these bacteria can simply feed on plastic used to make disposable beverage bottles for survival and growth.
With this discovery, U.S. Department of Energy’s National Renewable Energy Laboratory (NREL) and the United Kingdom’s University of Portsmouth dedicated a research team to determine the enzymes structure. While researching, the team inadvertently created a mutant PETase. “We hoped to determine its structure to aid in protein engineering, but we ended up going a step further and accidentally engineered an enzyme with improved performance at breaking down these plastics.” explained the research team in NREL’s statement.
It is estimated that a staggering 9 billion ton of plastics can be found on our planet ever since large scale plastic manufacturing came about in the 1950s. Within less than a century, plastic has become an indispensable product in modern civilisation due to its multifaceted properties. Plastics are complex polymers (strong, repeating chains of molecules that requires a long time to be broken down) that pose a severe threat to the environment and especially, the marine ecosystems.
As compared to the original enzyme, the mutant’s appetite has dramatically increased and the process of feeding has accelerated. Not only is this new creation more effective than PETase, the differentiating feature lies in its ability to consume another type of plastic, Polyethylene furandicarboxylate (PEF). “It is literally drilling holes through the PEF sample. This shows that by using PETase, PEF is even more biodegradable than PET,” said NREL’s Gregg Beckham, one of the leading researchers. This new creation opens a new door to offer a solution to the deteriorating ecosystem.
Although it is said that the mutant PETase is only around 20% more efficient than the original PETase, the main takeaway is that these enzymes are able to be optimised and enhance.
In other words, if scientists and researchers carry on their explorations and research, future engineered enzymes may be better at breaking down these plastics and would be able to break down other environmentally damaging materials as well.
Of course, time is of the essence and it would take a while before these creations can be able to break down the 9 billion of tonnes of plastic.
Now, with a proof of concept, we are able to use science to clear up the “trash” that we have fed earth with at a quicker pace. In the meantime, we can all do our part to help minimise the damage – small things such as using our own water bottles instead of buying disposable ones. “We can all play a significant part in dealing with the plastic problem. But the scientific community who ultimately created these ‘wonder-materials,’ must now use all the technology at their disposal to develop real solutions,” says University of Portsmouth’s John McGeehan in the same statement by NREL.
The UK Government has announced the end to the sale of plastic straws, drink stirrers and plastic-stemmed cotton buds at the start of the Commonwealth Heads of Government Summit.
Subject to the consultation, which the Environment Secretary Michael Gove will launch later this year, the UK Government is prepared to ban the sale of these items in England under plans to protect their rivers and seas and meet their 25 Year Environment Plan ambition to eliminate avoidable plastic waste. The announcement comes as the Prime Minister Theresa May urged all Commonwealth countries to sign-up to the newly-formed Commonwealth Clean Oceans Alliance and take action, be this by a ban on microbeads, a commitment to cutting down on single use plastic bags, or other steps to eliminate avoidable plastic waste.
“The UK government is a world leader on this issue, and the British public have shown passion and energy embracing our plastic bag charge and microbead ban, and today we have put forward ambitious plans to further reduce plastic waste from straws, stirrers and cotton buds,” the Prime Minister commented.
Single-use plastic items such as straws, stirrers and plastic-stemmed cotton buds have a significant impact on our environment, both on land and in our seas and rivers when they are either littered or discarded incorrectly after use – with a recent study showing 8.5 billion plastic straws are thrown away each year in the UK alone.
To drive this forward, the UK government has committed a £61.4 million package of funding to boost global research and help countries across the Commonwealth stop plastic waste from entering the oceans in the first place.
Mr Gove says, “We’ve already seen a number of retailers, bars and restaurants stepping up to the plate and cutting plastic use, however it’s only through government, businesses and the public working together that we will protect our environment for the next generation – we all have a role to play in turning the tide on plastic.”
It is something every dive-master or dive guide experiences at least once – that heart-stopping moment when a diver in your charge suddenly bolts for the surface. You assemble the other divers to accompany you or you leave them in the care of an assistant and you ascend slowly, praying that the diver who bolted is OK and cursing under your breath for not spotting that problem earlier.
You have done at least one thing correctly though. You have resisted the urge to chase them to the surface, knowing that, once a diver bolts, their own impetus along with expanding air makes it impossible to reach them and by going up quickly yourself to try and catch them, you risk turning one problem into two. You also have a responsibility to make sure the other divers in your group are OK before you deal with the diver who has bolted; they might have seen what has happened and become nervous too. In addition, if you suddenly disappear they might start to panic too.
As in many cases, you reunite with the panicked diver on the surface and they are OK; they had the presence of mind or the instinct to breathe out and vent their BCD as they ascended. But you know from your experience and training what could have happened and that you might have had a seriously injured diver on your hands. For many nights afterwards, you lie in bed wondering how you did not see the problem coming.
One of the most important things that we, as dive professionals, need to learn is how to identify stress in ourselves, recognise it in others and handle it when it occurs. If stress is not controlled early, it can lead to panic, and when people panic they usually respond in a way that makes the situation worse. In scuba diving, panic is a life threatening event and the major cause of diving fatalities worldwide.
Maybe you did not notice the signs of the impending panic because you were distracted by other issues. Your own stress can make you blind to signs of stress in others. So the first rule as soon as you put on your dive-master “hat,” is that you must put everything else behind you and give 100 percent of your attention to the divers in your care.
All this information and more can be obtained by chatting easily with them as they arrive to get their gear ready. You can use your boat and dive briefings to defuse many of the potential concerns and much of the apprehension. Anticipate what they might be worried about, for example, fast currents, cold water or poor visibility, and explain what steps you will be taking to minimise the problems these conditions can cause. All this information and more can be obtained by chatting easily with them as they arrive to get their gear ready. You can use your boat and dive briefings to defuse many of the potential concerns and much of the apprehension. Anticipate what they might be worried about, for example, fast currents, cold water or poor visibility, and explain what steps you will be taking to minimise the problems these conditions can cause.
You might also consider adopting and introducing your divers to visualisation and the in-water check, a couple of techniques that technical divers use before big dives but which I have found to be valuable tools for everyone.
Visualisation
After the boat briefing, encourage the divers to find a quiet place to sit on their own or with their buddy on the way to the dive-site, remove all thoughts from their minds about whatever else is going on in their lives and think only about the dive ahead. They should reflect on your briefing and what they have researched about the site or what they remember from previous dives there. Think positive thoughts, think about what they are going to see and visualise a successful dive. Picture them in control, relaxed, maintaining a steady breathing rate and good buoyancy and staying in touch with the dive team. Then reflect on the dive itself and all the cool things they might see. They should visualise themselves checking their computer and SPG frequently and making a slow, safe and controlled ascent with a safety stop, finally establishing buoyancy on the surface and ending the dive with plenty of air.
Visualising the dive and thinking about what is about to take place and how to deal with it builds self-confidence and puts a diver in a relaxed, positive, forward-looking frame of mind, the exact sort of attitude that everyone should have before any endeavour.
But this is not the only benefit. It is often the case that a positive visualisation before a dive will remove feelings of apprehension. Apprehension is best defined as a feeling of uncertainty about your ability to cope with a situation. The principal danger of embarking on a dive when you are apprehensive can build and turn into full-blown panic in the event of even a minor emergency.
Visualisation can also help the diver identify problems in advance or warn them of any aspects of the dive that they may not be comfortable with that they can then share with you. Maybe they will realise during their visualisation of the end of the dive that they have forgotten their safety sausage. Far better to remember that before the dive than when they reach for it later!
In-Water Check
We all learn the pre-dive safety check during our Open Water course and this soon becomes something we do instinctively. Another really good habit to acquire is to perform an in-water check at the start of your dive. The whole process of gearing up on a busy boat, entering the water and descending can be rushed and stressful and it can undo all the positive effects of your pre-dive visualisation. So once you have left the surface and are a couple of metres under water, surrounded by the peace and quiet of the ocean, go through a quick in-water check. Take a few seconds to compose yourself, relax, get a long, slow, deep breathing cycle going, make sure all your equipment is intact, buckles are fastened, nothing is leaking and gauges are working before setting off calmly for the depths.
Controlling Stress on the Dive
Even if a diver has completely prepared, there is always the possibility that stress can occur during a dive. The most common forms are:
– time pressure stress from having a limited air supply; and
– compounded stress from task loading; for instance, the feeling of inadequacy can arise when you are managing an underwater camera and dive light on a night dive while controlling buoyancy and trying to keep in touch with the rest of your team.
Careful observation and managing the speed of your group will ensure that these stressors do not escalate into panic. A useful trick to help you monitor how much air your divers have left without constantly going around asking them to show you their SPGs is to spot something cool to show them about 10 minutes into the dive and then circle behind them while they are all crowding to look at it to take a sneaky look at how much air they each have left. See who has used most and then you will know which diver you have to keep an eye on, in the certain knowledge that the others will always have more left than he does (yes, it is usually a he!).
If you want to be even more subtle, compare how much air your target diver has with how much you have left and do a little mental arithmetic as the dive progresses. For example: when you check your target diver after 10 minutes and he has used 20 bar while you have used 10 bar. It is likely therefore that by the time you have used 50 bar he will have used 100 bar – easy, isn’t it?
Of course this is not an exact science and you need to be conservative. You should be alert too for changes in breathing patterns; an out-of-shape diver with good buoyancy going with the flow and sipping his air may suddenly become a panting, gas-guzzling monster if the current drops or shifts direction.
The identification and management of stress is an important topic that does not always receive the attention it should in diver training materials. If you are interested in learning more I recommend the excellent book by Arthur Bachrach and Glen Egstrom, Stress and Performance in Diving. It is thought provoking and highly readable. Also worth looking at are articles titled The Tao of Survival Underwater and Psychological Aspects and Survival Strategies easily found on the Internet.
Indications of Diver Stress
Lack of preparedness or procrastination on the part of the diver
Increased or rapid breathing/shallow breathing
Poor aquatic ability and scuba skills
Unnecessary treading of water
Evidence of claustrophobia or discomfort with gear
Constant fiddling with equipment
Lack of any buoyancy control
Wide-eyed expression
Not acknowledging signals
Constant complaints about gear, diving conditions, skill performances
Did you know that an average of 70 percent of divers contact the reef while diving? Such threats from diving are not always made aware to divers. In response, Green Fins has launched a four-part campaign to cultivate a positive behaviour change within the diving community with one main objective: making sustainable diving the social norm.
“Redefine the Dive” is Green Fins’ first step to initiating a positive movement towards sustainable diving. Check out the Green Fins IYOR 2018 #RedefineTheDive infographic and identify all the threats diving can have, and get tips and tricks on how you can redefine the way you dive. Follow this link to share the infographic with your fellow divers! And while you’re doing that, do you want to win a Liveaboard trip in the Caribbean with Explorer Ventures or Fourth Element sustainable products? Just follow the steps under this link.
For more information on the International Year of the Reef 2018 follow this link: www.iyor2018.org
Snoots are devices that reduce beam angles from light sources in order to provide photographers with more control over the illumination of their subjects. In their simplest form, snoots can be just cylindrical pieces of tubing attached to the front of a strobe or other light source. Other designs incorporate a fine grid – resembling the grill of a car – at the snoot’s tip to further direct the exiting light beam. Commercial snoots are offered by a limited number of maufacturers, such as Seacam, which are fitted specifically to their strobes. But snoots can also be constructed from common household items such as toilet paper rolls, funnels, and PVC piping.
The diameter of a snoot’s front and back opening and its proximity to the light source are two factors that affect the angle and size of the beam. The smaller and closer the “entrance” aperture and the smaller and farther the “exit” aperture, the narrower the beam will be — and vice versa.
The intensity of a snooted light beam is dependent on the reflectivity of the internal surfaces of a snoot. When constructed from highly reflective materials (i.e. white, silver, mirrored, etc.), it’s possible to create a more concentrated light beam than the unsnooted strobe, so battery life can be prolonged. Conversely, when constructed from highly absorptive materials (i.e. black), you may need to boost the strobe power to maximum in order to obtain enough illumination.
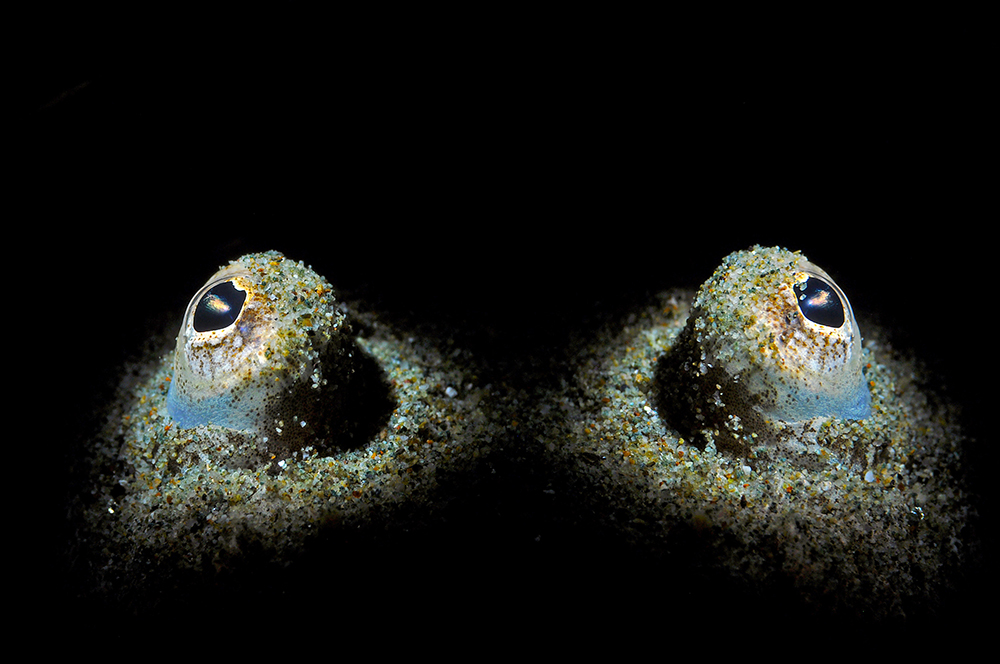
The eyes of a stargazer are highlighted by a unique lighting system using two snoots. The image was taken at night during a shore dive in Ambon, Indonesia
Why use a snoot?
♦ Isolate the main subject
Photographers strive to create images with black backgrounds to make the subject in the foreground “pop,” but it’s difficult to prevent strobe light from hitting the background as well — a snoot can solve this problem. Since a strobe’s beam angle is greatly restricted by a snoot, the light can be projected exactly where you want it, eliminating distracting background and foreground elements and giving a spotlight effect.
♦ Minimize backscatter
Backscatter is seen in images when stray strobe light illuminates suspended particles between the camera’s lens and the subject. By snooting a strobe, you decrease the beam angle, making it easier to control stray light and minimizing backscatter.
♦ Illuminate directionally
Light coming out of a heavily-snooted strobe is strongly narrowed and much more directional – as if it was coming from a distant source. Because the snooted light rays are more parallel with each other, they create harsh, sharp-edged shadows when cast over a textured surface. When using a snoot to create these shadows, remember that narrower beams produce sharper shadows.
This property can be used to emphasize textures of corals, create dramatic shadowed images, or give common subjects unusual moods.
♦ Create unique images
These uses of snoots can be combined to create exciting, thought- provoking, and most importantly, unique images. Even the most common subjects can be given a “wow factor,” which can make your trip’s image gallery instantly more memorable than others.
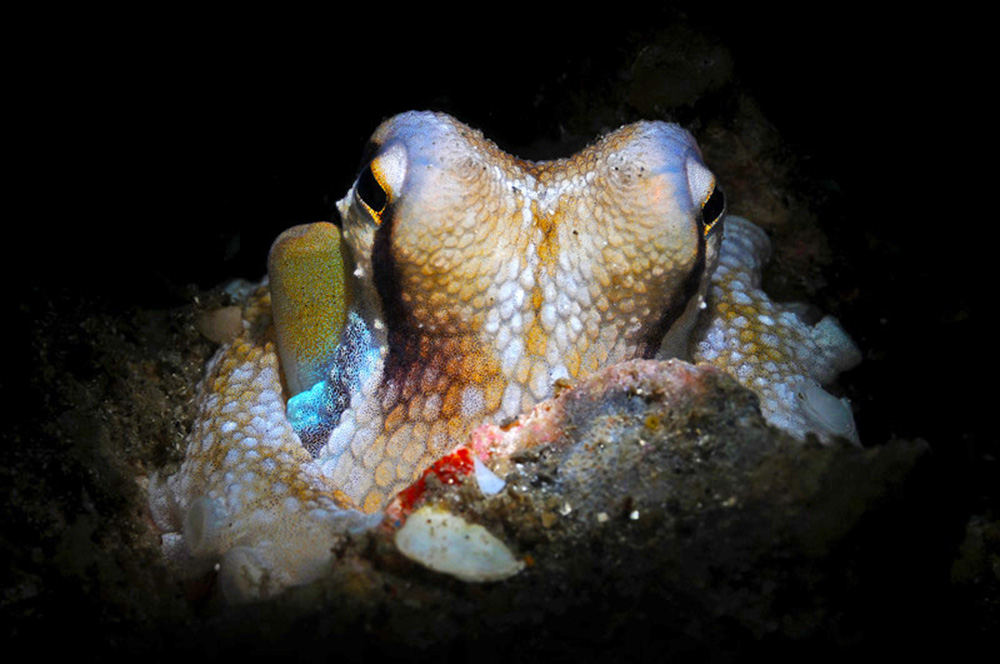
A mantis shrimp peers up and out of its burrow, only to be greeted by a snoot
Design and Application
Snoots can be used in wide-angle, macro, and super macro photography. However, their design and method of application to each of these branches of photography differ greatly.
♦ Wide-Angle
Wide-angle snoots are the simplest to construct. In most cases, sharp-edged beams are not necessary, so very short and wide aperture snoots are often enough to do the trick.
Aiming strobes with laser precision isn’t necessary in wideangle snoot photography since you can usually eyeball proper alignment relatively easily. If your strobe has a strong modeling light, turn it on and use it to simplify the aiming process. Don’t be afraid to take some initial test shots to make sure that the light is being directed where you want it.
If your subject is in deep water, you might want to take a single photo of it with “normal” lighting for reference and then find a shallow area where you can fiddle around with your lights all day long. Using a reference image and experimenting in the actual subject.
Controlling the ambient light in a scene can really showcase the capability of snoots. By increasing the shutter speed, or F-stop, the main subject will be well exposed by the spotlight from the snoot while the rest of the scene will remain intentionally dark. Alternatively, by using two strobes – one snooted and one not – you can gently illuminate the general foreground to add color, but still have the main subject pop out of the scene.
A brownstripe octopus patiently waits for photographer Keri Wilk to aim his snoot
♦ Macro/Super Macro
Since the camera’s field of view in macro photography is small, you’ll need a correspondingly small beam of light to selectively illuminate a portion of it. This requires the use of a snoot that is farther away from the source and has a much smaller aperture.
As with wide-angle snoots, it’s very important to have the ability to vary the beam’s angle to maintain creative freedom, so keep this in mind if you’re trying to design your own.
Aiming snoots for macro imaging is far more difficult, frustrating, and time-consuming than snooting wide-angle images. This is especially true for super-macro photography, where many of the subjects are often no larger than a grain of rice.
When using a snoot to shoot a macro scene with a broad, directional lighting effect, you can follow the same aiming procedure as explained for wide-angle snooting. However, if you want to effectively and accurately create macro/super macro images with a spotlight effect, you’ll have to follow a very different, and somewhat tedious, route.
Trying to hit a two-centimeter subject with a one-centimeter (1/2 inch) beam of light is no easy feat. While it is possible to aim a miniscule beam with the strobe still attached to the housing, it is far easier to detach the strobe from the camera system altogether. Being able to move the camera without disrupting the strobe configuration makes a world of difference.
Macro snooting can be made even easier if you connect your strobe to a remote trigger, instead of hard-wiring it to the camera with a sync cord. This gives you total freedom, because there are literally no strings (or cords) attached. You can even take it one step further and mount this remote strobe on a small tripod fitted with a ball-head, allowing you to position the strobe in just about any orientation. This will ensure that if you do manage to get your snooted strobe perfectly placed, it will remain there while you compose your image.
Of course, this means you will need to choose subjects that are very slow-moving or, better yet, that don’t move at all: scorpionfish, frogfish, stargazers, and coral polyps all make for perfect snooting.
The increasing accessibility of underwater photography is constantly driving photographers to be more creative. Without bringing new tools or techniques to the table, the art of underwater photography is in danger of becoming stagnant. This is precisely why tools like the snoot are essential – to advance this discipline. Whether they’re used for creating black backgrounds, spotlighting, or hard-edged directional lighting, there’s no doubt that snoots are very capable tools for creatively lighting underwater subjects.
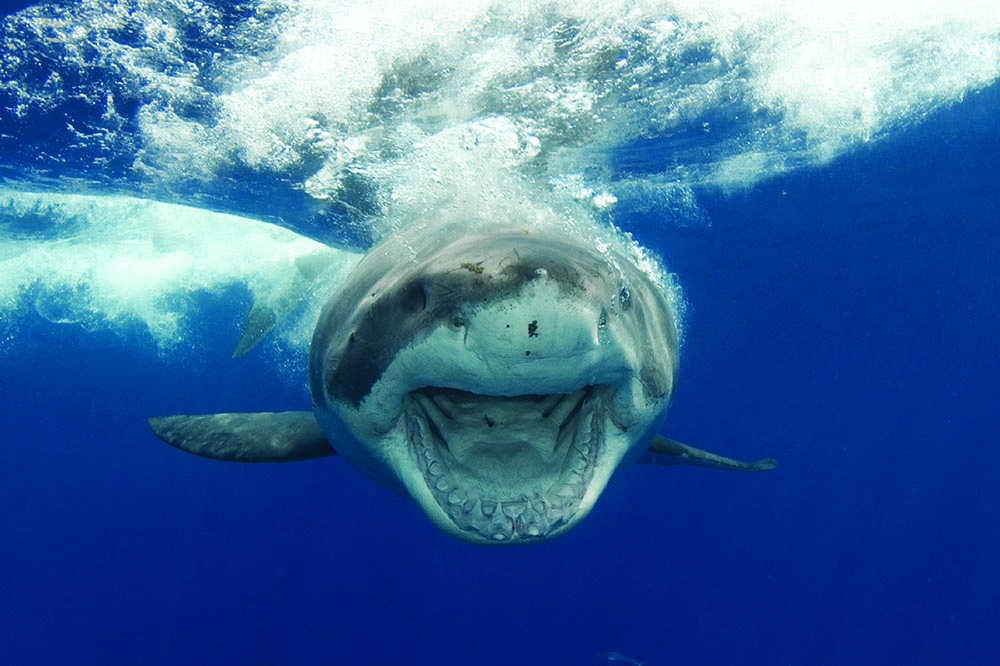
Great white shark, Carcharodon carcharias, Guadalupe Island, Mexico, Eastern Pacific Ocean
THE ENCOUNTER
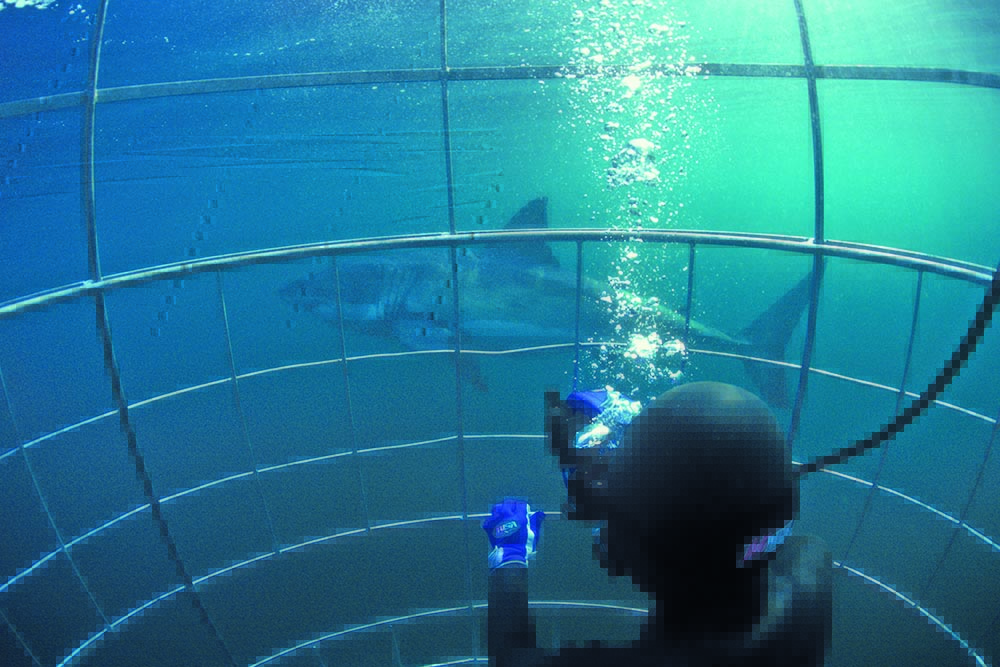
The first day was interesting because, even with no bait, we encountered nine different great whites, checking out the cages – one of them, a 4.5-metre shark named Shredder, has been spotted at Guadalupe Island every year for seven years. He introduced himself to the boat seven years ago by biting off the anchor rope. While the crew was looking over the bow at the 1.5 metres of rope he left, he breached and took all 1.5 metres with him. He has since learned to interact better with humans.
I have to admit that being in a cage made of 2.5-centimetre square aluminium pipes, knowing that three-tonne great whites with jaws strong enough to crush it like a bunch of grapes were swimming around outside, did not make me feel very secure. Fortunately, these sharks had plenty to eat with a resident fur and elephant seal colony providing a major source of food. In fact, an intrepid fur seal swam out to the boat and tormented the great whites for well over a half hour. It was amazing to watch. I was on the boat, but could see the action because of the almost transparent water: the seal was a clear victor.
One disconcerting thing about the great whites was that two of the largest males, Shredder and Harvey, would cruise by the cage, so close that their pectoral fins sometimes bumped the vertical bars of the cage as they passed slowly by. They would make direct eye contact with each of us in the cage, holding that gaze a moment and then moving on to the next person. I could not help wondering what these two might be thinking…
Some of the sharks possessed a flawless beauty and some had impressive scars. Chica, a large female, had sustained a severe injury to her tail with the top third bending down at a 90-degree angle. Shredder had big chunks missing down the back of his dorsal fin and scars everywhere. Whoever said that sharks are cautious has never met Shredder!
Guadalupe Island has been declared a protected biosphere and there is ongoing research to track and monitor great white sharks by identifying and naming them. In seven years, this project has identified 96 different sharks. Some sharks have been coming back year after year like Shredder, Lucy, Chica, Skid and Harvey.
Photo by Stephen Wong
THE SCIENCE
Research has revealed an extraordinary range of complex behaviours, more on par with that of large terrestrial social carnivores, such as wolves and lions. The white shark is an active, nomadic, highly maneuverable and agile social animal that shows a wide variety of sophisticated interactions with its peers and other marine organisms and humans. White shark physiology is also unique in that it’s essentially a warm-blood fish, maintaining a constant high body temperature even in cold water. This allows the predator a cosmopolitan diet and the ability to travel great distances and occupy many marine habitats, all of which have contributed to an evolutionary advantage over many of its aquatic marine rivals. Though white sharks are often sighted swimming solitary, they are, in fact, very social and tend to travel in small aggregate groups of associated individuals. Where there’s one, there’s more. The formation of social structure, a pecking-order if you will, within the species appears to be based not only on size but, perhaps more importantly, individual aggression level. When white sharks are present in numbers, there appears to be some degree of sexual segregation and age class discrimination. Males tend to hang out with others males of roughly the same size, which suggests relative age. Same goes for the females, though it is not uncommon to see both sexes present at micro-feeding sites such as rocky pinnacles along tuna migratory routes or pinniped colonies. As to what rituals may take place during mating competition, all bets are off.
Knowledge of the reproductive life cycle of white sharks is limited, due to the inaccessibility of the species. Adult white sharks are so large and relatively uncommon that they are not captured frequently anywhere by any method. Mating habits such as pre-copulatory behaviour, and actual copulation has never been witnessed, nor has a gravid white shark giving birth ever been recorded! We do know that males reach sexual maturity at around 3.5-4.1m at an age of 9 or ten years, with females larger at between 4-5m at an age of 12-14 years. There are few records of pregnant females and sparse data on litter size, with approximately 2 to ten foetuses being born per reproductive cycle. The pups are large at birth ranging from 1.1-1.6m. During development within the uterus, embryos and foetuses are oophagous, eating large numbers of nutritive eggs produced by the mother’s ovary. The gestation period is not known for certain but may be 12 months or more and gestations take place at two to three year intervals. Free swimming neonate white sharks are occasionally sighted in warm temperate coastal waters, with birth possibly occurring during spring and summer where subsurface water temperatures are at their peak.
White sharks engage in not only short-term and long-term coastal travel circuits but now appear to make trans oceanic migrations. Satellite telemetry, remote sensing and genetic studies indicate that these sharks are highly migratory, crossing entire ocean basins. In the eastern north Pacific, along the west coast of North America, they travel annually between Mexico and the Hawaiian Islands.
The white shark is the largest carnivorous fish. It is an apical “super-predator” with a broad prey spectrum. They prefer marine vertebrates but will also consume larger invertebrates such as cephalopods, gastropods, and crustaceans. Bony fish, sharks, skates, rays and marine mammals are their chief prey, but they also take marine birds and reptiles. They will scavenge on fisheries discards, dead marine mammal carcasses such as whales and fishes caught in various fishing gear. Larger white sharks tend to consume larger prey. However, white sharks are highly opportunistic feeders and efficient predators, capable of chasing and capturing fast moving prey such as mako sharks, tuna, swordfish, dolphins and eared seals. White sharks occasionally attack people, but rarely consume them; the low frequency of attacks on humans compared to the abundance of divers, swimmers and surfers where they occur as well as the nature of most attacks, suggest that the white shark attacks on people are primarily non-predatory in motivation.
Photo by Andy Murch
THE DOs & DON’Ts
White sharks are, like most sharks, often just out of sight, watching you, and it’s never the shark you can see that you need to worry about. When looking straight down from the surface, you could be looking right at one and, because of their incredible camouflage skills, you wouldn’t see it unless you have a trained eye or great luck; but from the side or head-on perspective, there is no missing them. If you’re patient you can get great shots of these silent hunters. White sharks have a natural instinct to chase that which retreats from them. So, as they approach, stay still, take the photo and stay out of reach to avoid triggering that reaction. Some easy rules to remember include being patient, never getting out of the cage to look for them, letting them come to you and never trying to touch them. Follow these and you’ll get top-notch photos.
Because they are so curious, they will come right up to you and check you out, which is when you snap away. A good shark diving operation will be chumming with the shark’s natural prey, which will bring them close. Once they get there and see you floating like a tea bag in the deep blue ocean, they will often stick around and give you a good show.
The best action happens near the surface, which is also where the best light is! I like to use a strobe for fill, set very low, to bring out some more colour but the best shots are often taken with daylight. On a sunny day, you can shoot at a low ISO and without strobes.
As for camera equipment, I would suggest, for the pros, a good SLR with which you can shoot fully manual or automatic. One key feature to have is a focus lock: the shark is often moving slowly, in a circular or back-and forth pattern, but once in a while it snaps its massive tail and moves extremely fast. A focus lock will allow you to get a good, clear shot and prevent your camera from constantly adjusting focus points. Olympus makes great SLRs with plenty of seals to keep moisture out, like the E3 or the E-620. I shoot a variety of SLRs and protect them with Aquatica housings. A housing should never be more complicated than the camera itself, with all the functions of the camera still available including the focus lock.
For the novice, an Olympus Stylus 8000 is a great starter: it is light, compact, point-and-shoot and waterproof, so no housing is required. Otherwise, Sealife makes amazing underwater pointand- shoot cameras for very affordable prices as well.
For video, I recommend a Gates HF-S11 housing, which fits a variety of Canon HD camcorders for amateur videographers. They are great lightweight, easy-to-use systems with amazing results. If you’re a pro, you can’t go wrong with a Gates HPX 3700 housing for the Panasonic Aj-HPX2700/3700/3000 cameras. These cameras can truly achieve broadcast quality.
The great white is one of the most incredible creatures on this planet and deserves to be protected and respected. The moment you see one for the first time, you will fall in love. Be safe and may the sharks be with you.
IN A NUTSHELL
Scientific Name: Carcharodon carcharias
Weight: Up to 1,900 kg
Life Expectancy: 100 years
Conservation Status: IUCN Vulnerable
Size: 3.5 to 6+ m, The female is generally larger than the male
Diet: In general, juveniles feed on fish, while adults feed primarily on larger vertebrate prey
Habitat: Very shallow water, inshore to open ocean, and oceanic islands from the surface to 1,300 metres