Register now for the fourth World Ocean Council Sustainable Ocean Summit (SOS) and take advantage of early registration rates!
Leadership companies from the diverse ocean business community will gather from 30 November to 2 December in Rotterdam, Netherlands to advance “Corporate Ocean Responsibility” under the SOS 2016 theme, “Ocean 2030: Sustainable Development Goals and the Ocean Business Community”.
SOS 2016 provides a global platform for leadership companies and organisations to advance the development and implementation of industry-driven solutions to ocean sustainability challenges. The SOS 2016 theme is “Ocean 2030: Sustainable Development Goals and the Ocean Business Community”.
The SOS is uniquely designed to bring together leadership companies from the diverse ocean business community: shipping, oil and gas, fisheries, aquaculture, seabed mining, tourism, renewable energy, ports, dredging, mining, submarine cables, marine science, engineering and technology, the maritime legal, financial and insurance communities, and others – as well as ocean stakeholders from the government, inter-governmental, academic and environment communities.
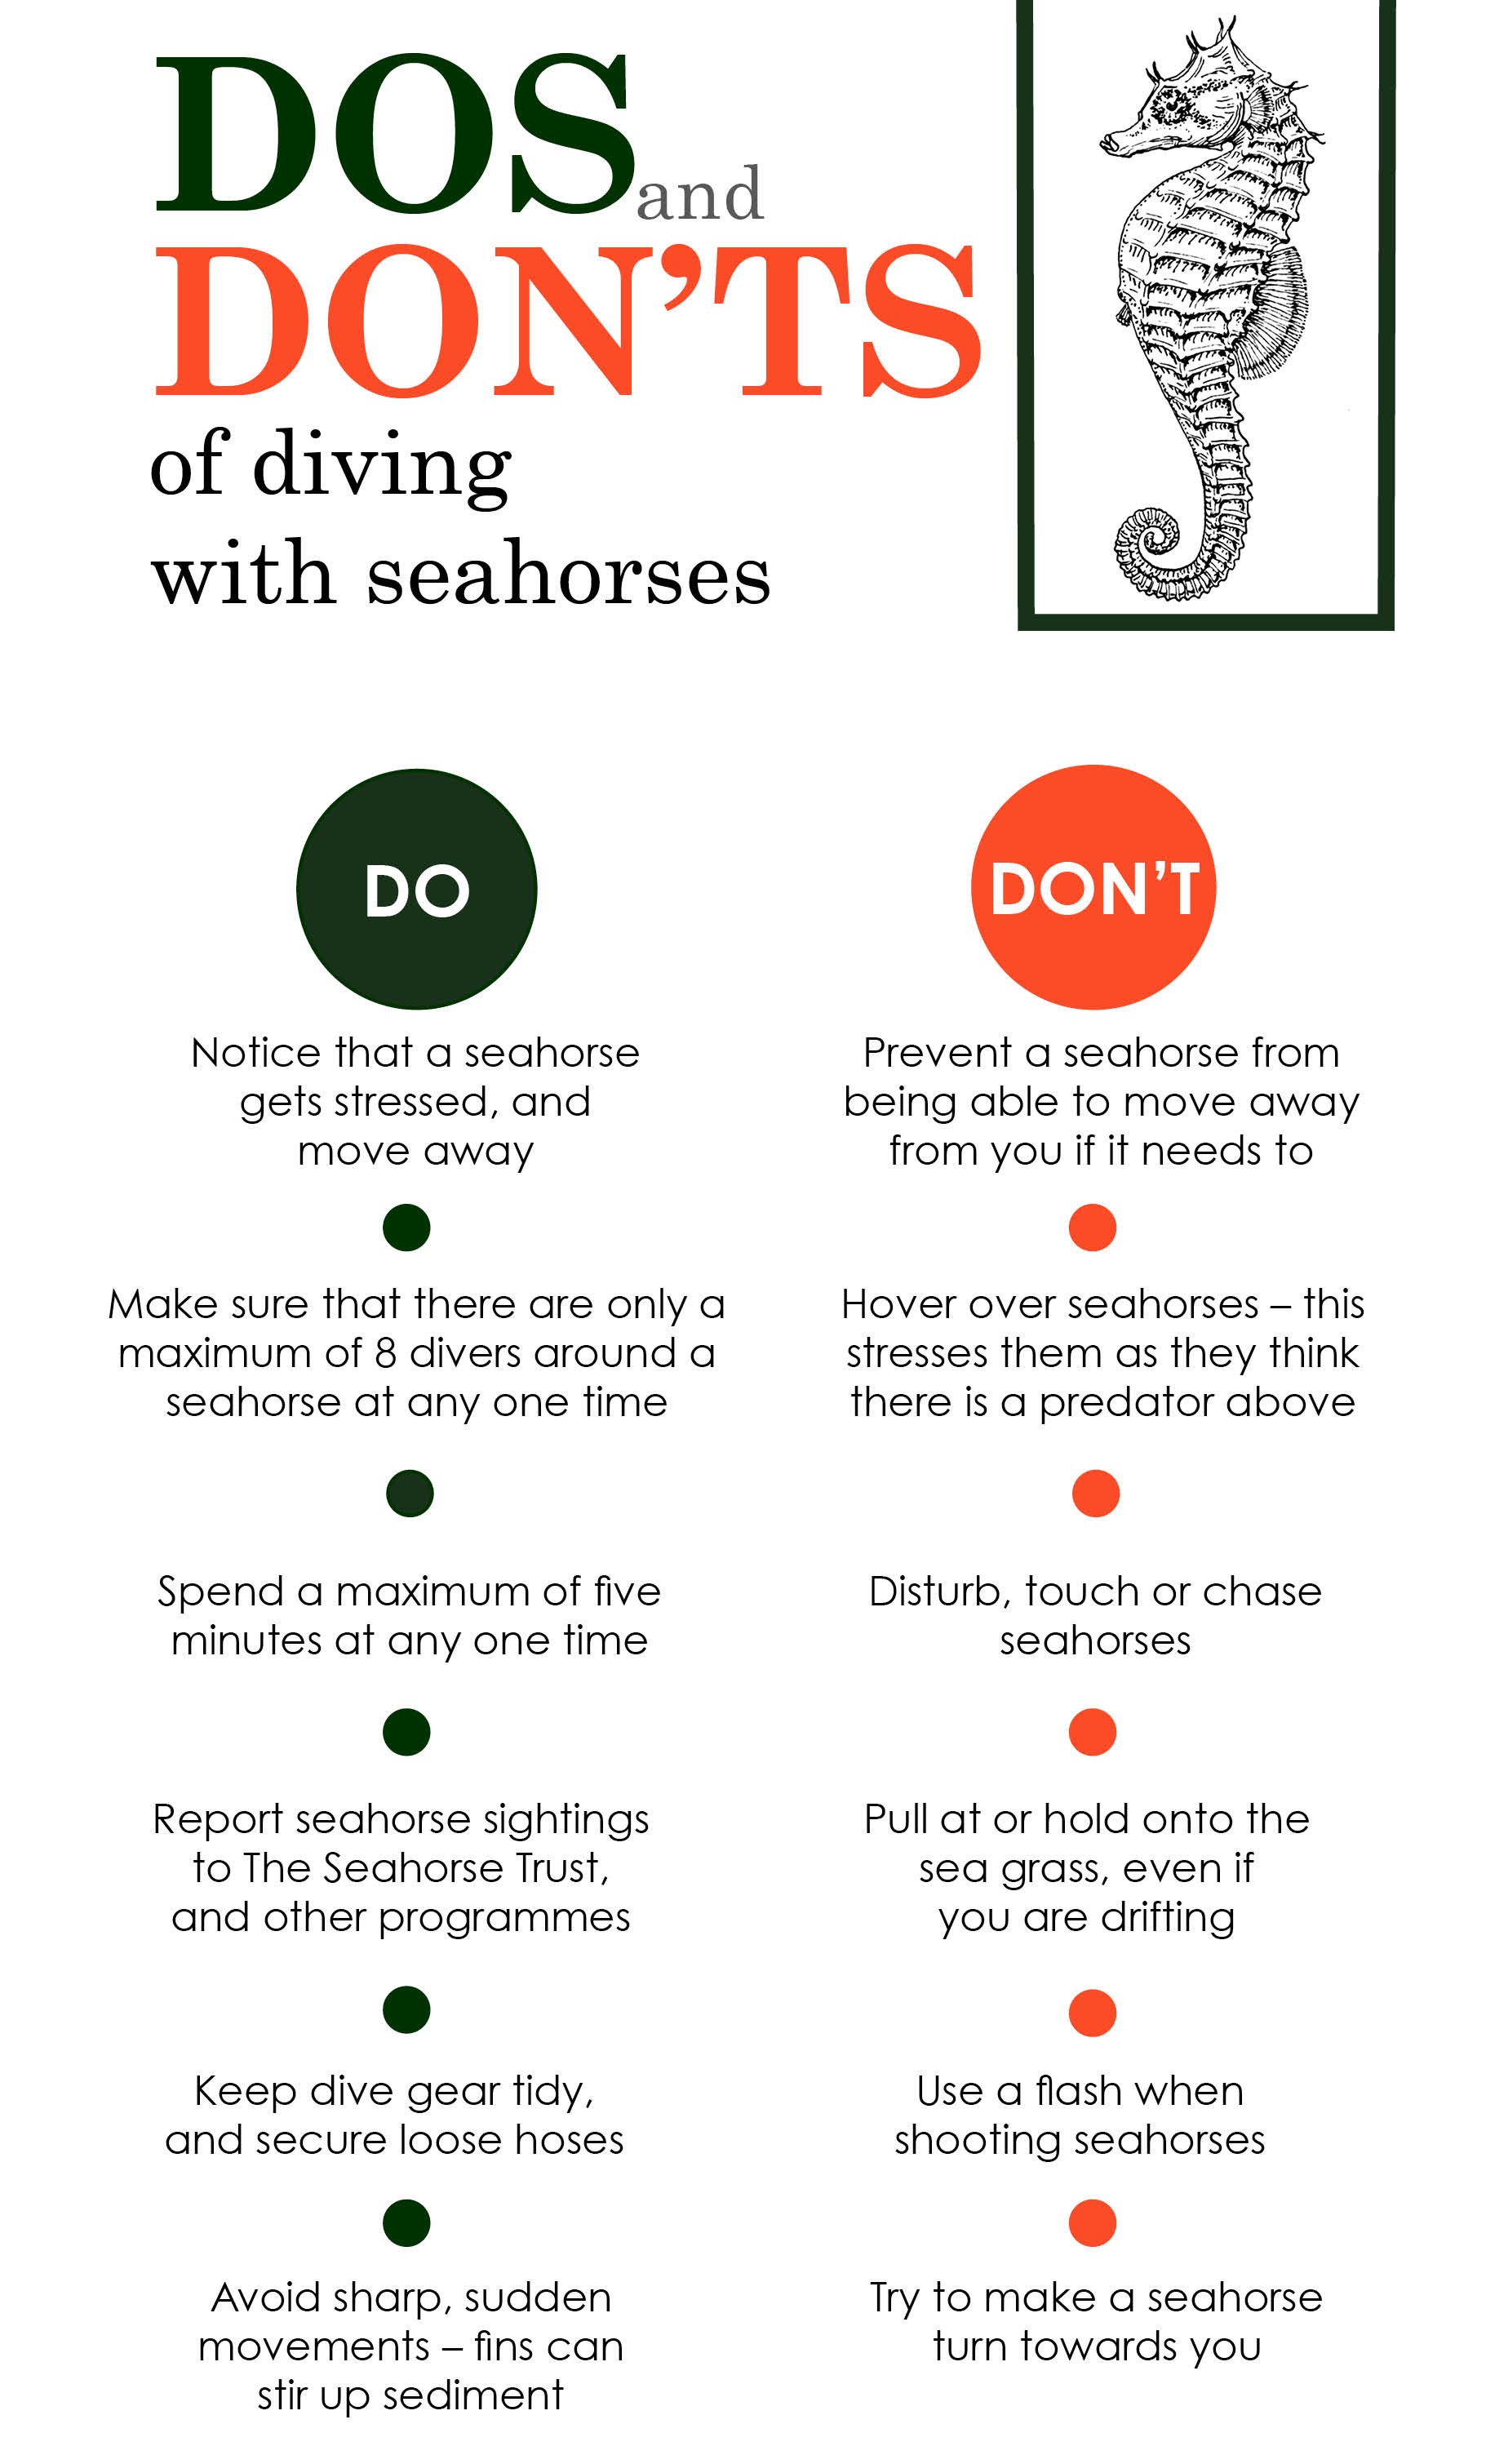
Seahorses are easily stressed and it is crucial that we keep our impact to a minimum, and not add to the stress they endure naturally, by adopting a best practice approach to diving with them. Only by doing this can we help not only the conservation of the seahorse, but also the habitat in which they, and so many other vulnerable species, are found.
Seahorses are protected in various countries around the world, so check out the local laws and regulations if you want to see them, and importantly, find a good local guide who knows the area and can help you find them.
The following guidelines have been put together to make sure that seahorses stay safe, and that you as a diver can get the best out of your experience.
This article, by marine biologist Neil Garrick-Maidment, originally featured in Asian Diver’s “The Big Blue Book”. Find out more about Neil’s work and career here.
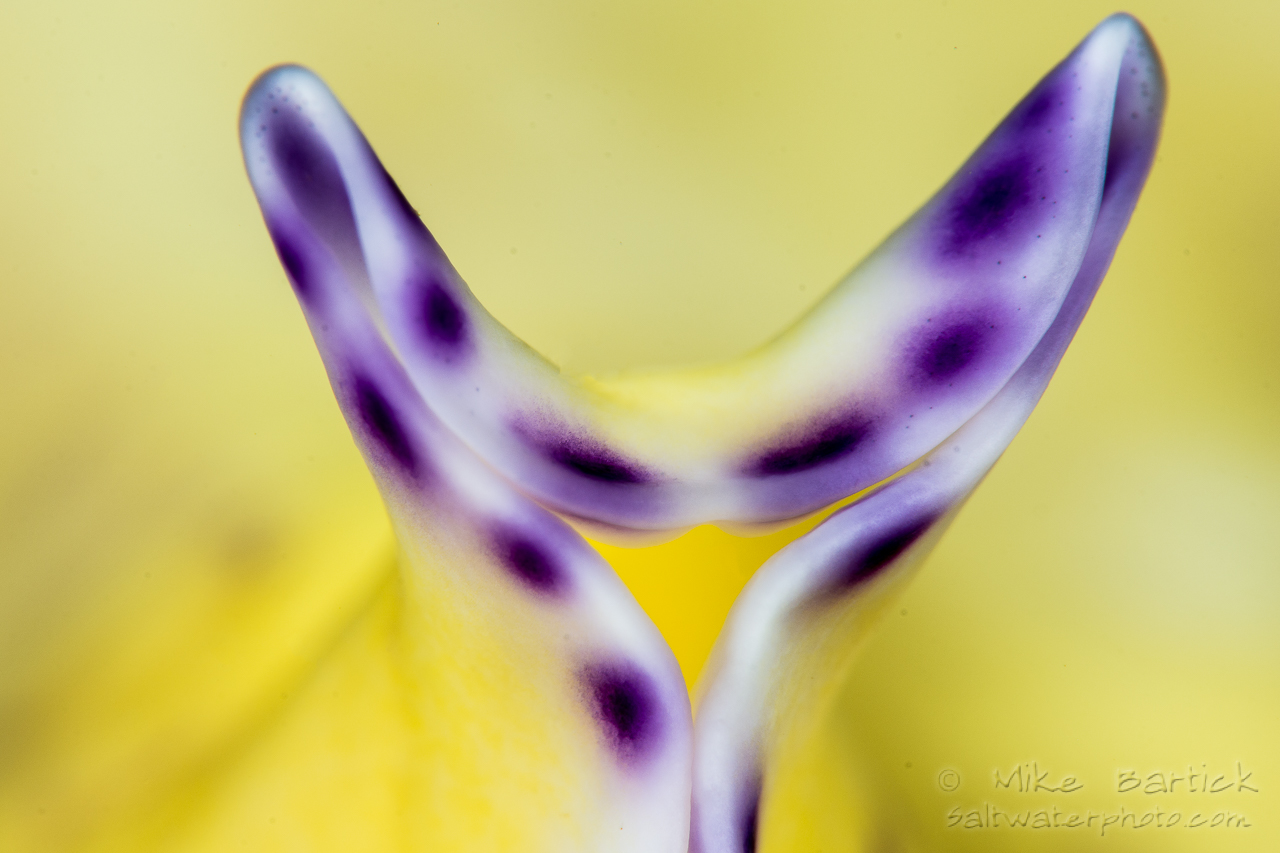
Underwater photographer and small animal expert Mike Bartick offloads tips and techniques to create great compositions that work
When was the last time that you complimented a chef on the pans he used to create your meal… Never? Of course not. Then why would anyone assume that your camera must be top-notch because your images are so punchy!
As crazy as this comparison might seem, you would be surprised at how many times I hear it. The truth is that while quality gear is important, it’s the mastery of your gear that really counts. Capturing the best possible image is always the goal, but turning a good shot into a great photo can be as easy as applying some simple compositional ideas.
The basics
All compositions are subjective. Understanding different types of compositions is the first step to developing your own style.
Most people learn through doing or through visual illustration: Looking in magazines, checking artwork and paying close attention to your own eye’s pathway when viewing an image will also help with learning composition. Teaching yourself what is strong and what isn’t in a composition is a simple exercise that is rarely taught but subconsciously always used.
A great composition keeps the viewer’s eye on the photo and leads it through the image; if the eye slips off the frame then it’s a quick lesson in poor composition. On the other hand, if it loops back and stays on-frame, then you know you have a strong composition. Look at any photo, close your eyes, then after a few seconds open them. Analyse what is happening. This simple exercise will quickly teach your brain what is hot and what is not and lead to a better understanding of strong compositions.
It’s important to scrutinise your images or even ask someone that isn’t related to you to select the best of three images presented. This will also help you to disconnect from your own work and is crucial in developing a commercial eye.
Flow, balance, depth, and design will soon make sense as we begin with these four basic – yet effective – ideas:
Rule of thirds
Framing
Negative Space
Filling the frame
Rule of thirds
The “rule of thirds” is perhaps the most used and trusted method for creating universally eye-pleasing images. It’s first taught in any class and relied on by sculptors, painters and photographers alike. The simplest way to start using this method right now is to use images that have already been captured and process them using the “grid line overlays” in Lightroom or Photoshop. This is normally activated when the crop tool is selected in either editing platform.
Think of the rule of thirds as a tic-tac-toe outline or a hashtag, setting up the framework to position your image.
The intersecting waypoints are your anchors and your subject flowing through these intersecting lines will help you to build the image.
This is the image as shot from the camera. For me the image feels off balance and has a weak presence in the frame. My eye needs a little assistance on direction but still follows a good line from corner to corner. This is a workable photo if I can save it…
This image has been processed by cropping for composition using the rule of thirds as my guide. When cropping, be sure to use the proper aspect ratio to keep it true to the shape of the sensor. Pulling the image through the waypoints (points of interest of the rule of thirds), setting up a stronger corner to corner line and directing my eye to follow the subject from front to back and looping in again. My eye does not leave the page. This image has been saved.
Learning this in Adobe Lightroom or Photoshop will help you shoot it this way the next time the chance avails itself.
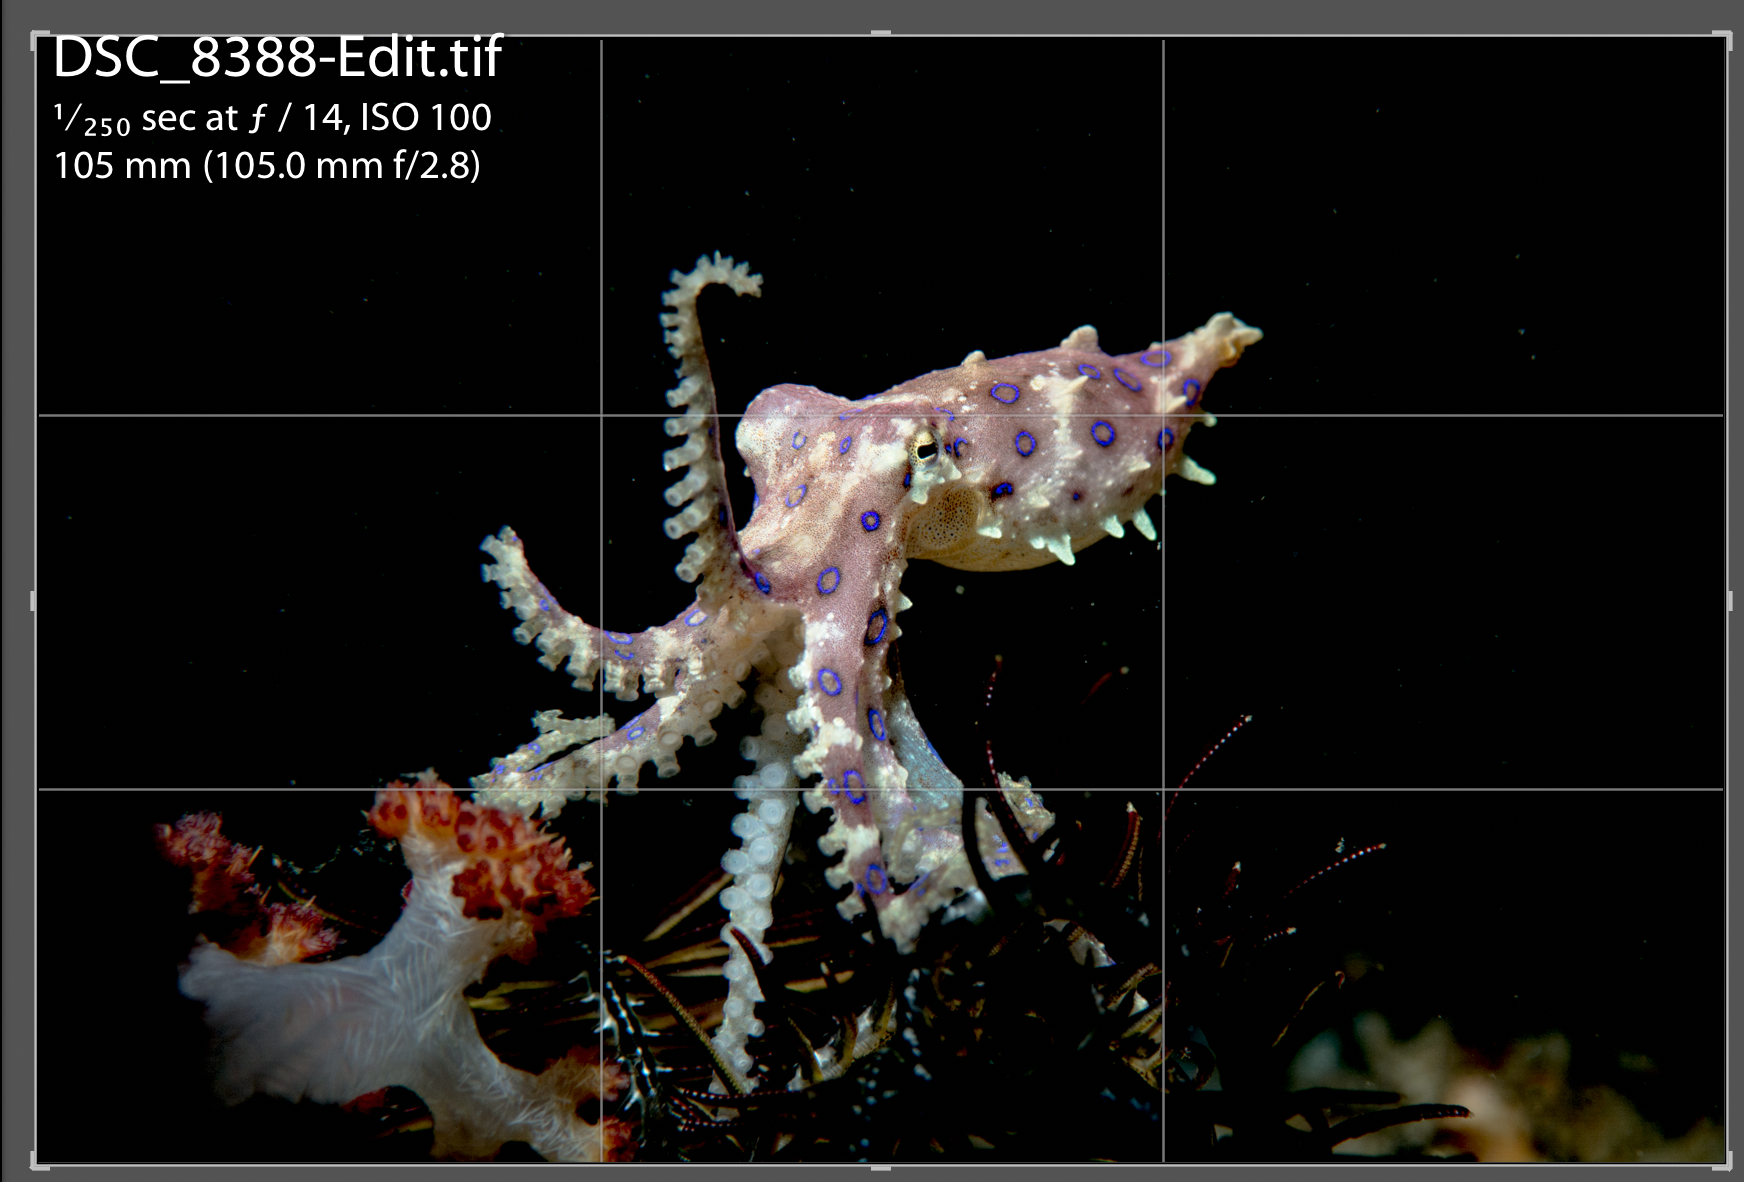
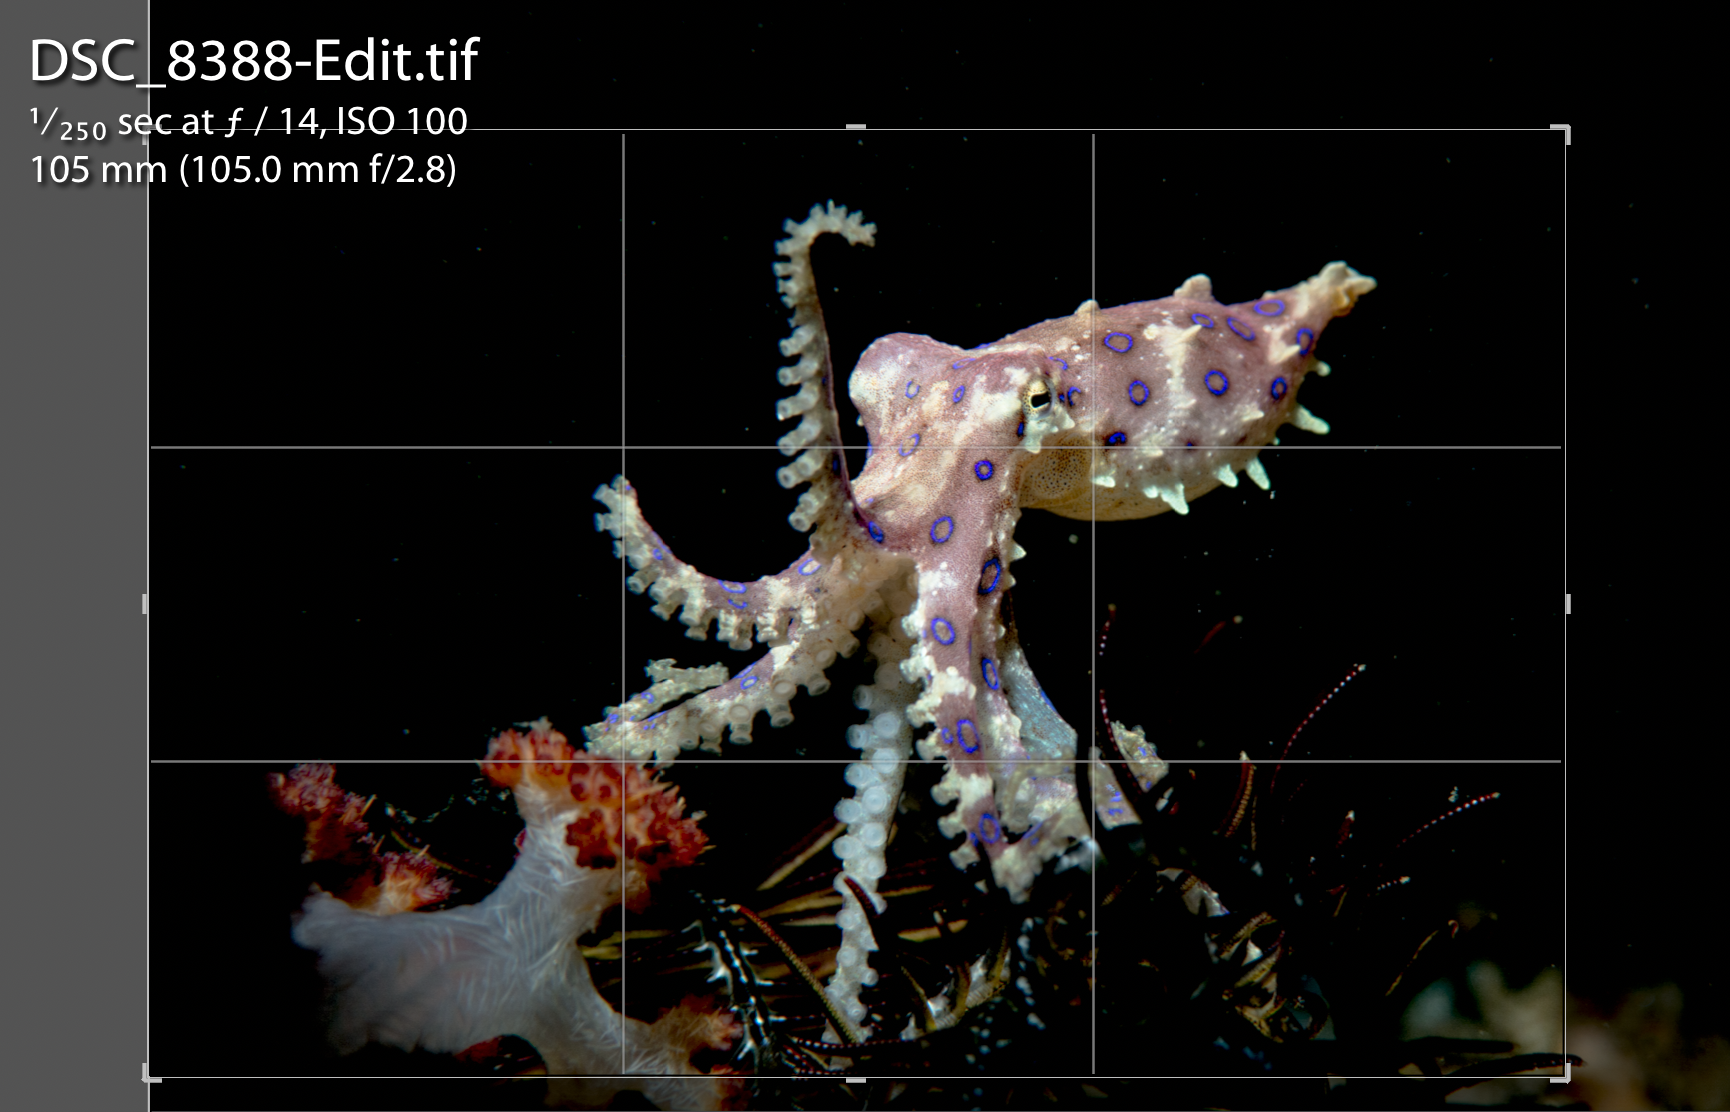
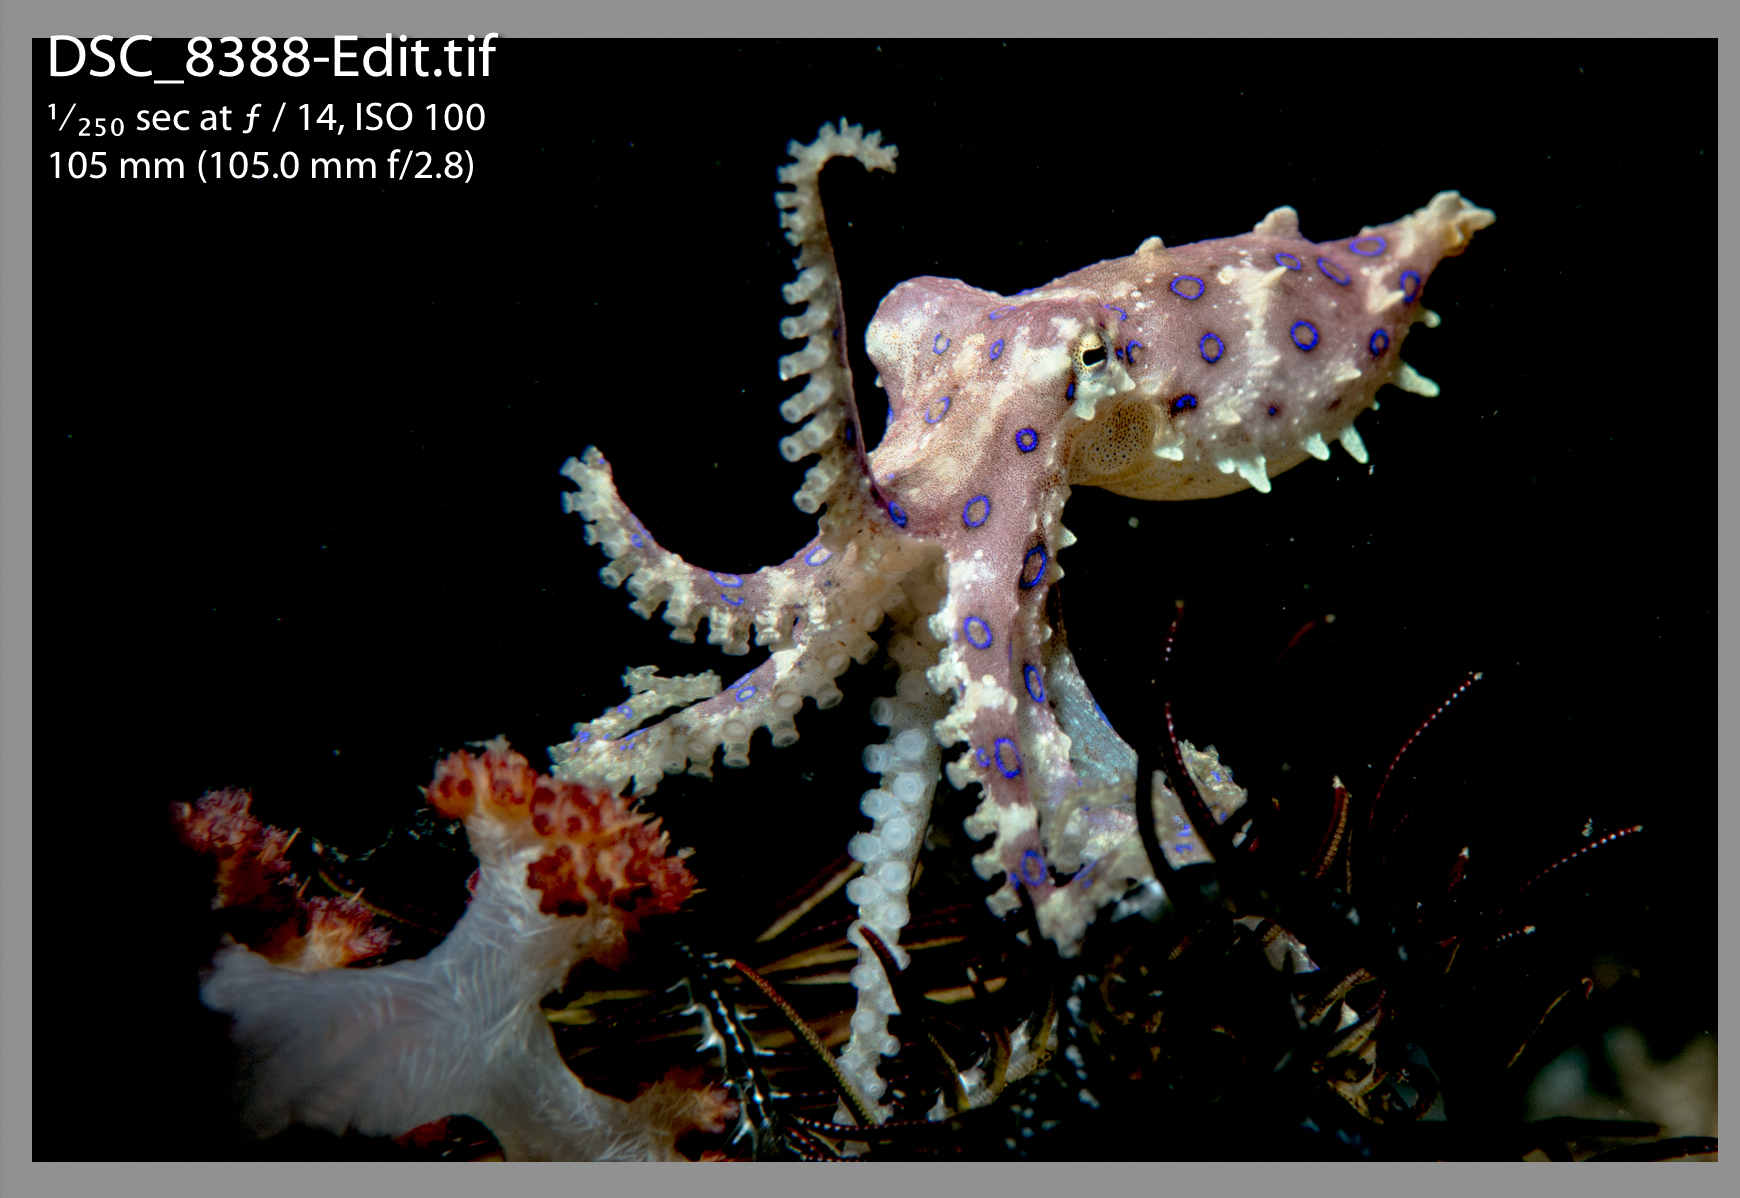
The blue-ringed octopus below is set up the same way. Have a look at both examples. Although the change is subtle, it still makes an impact.
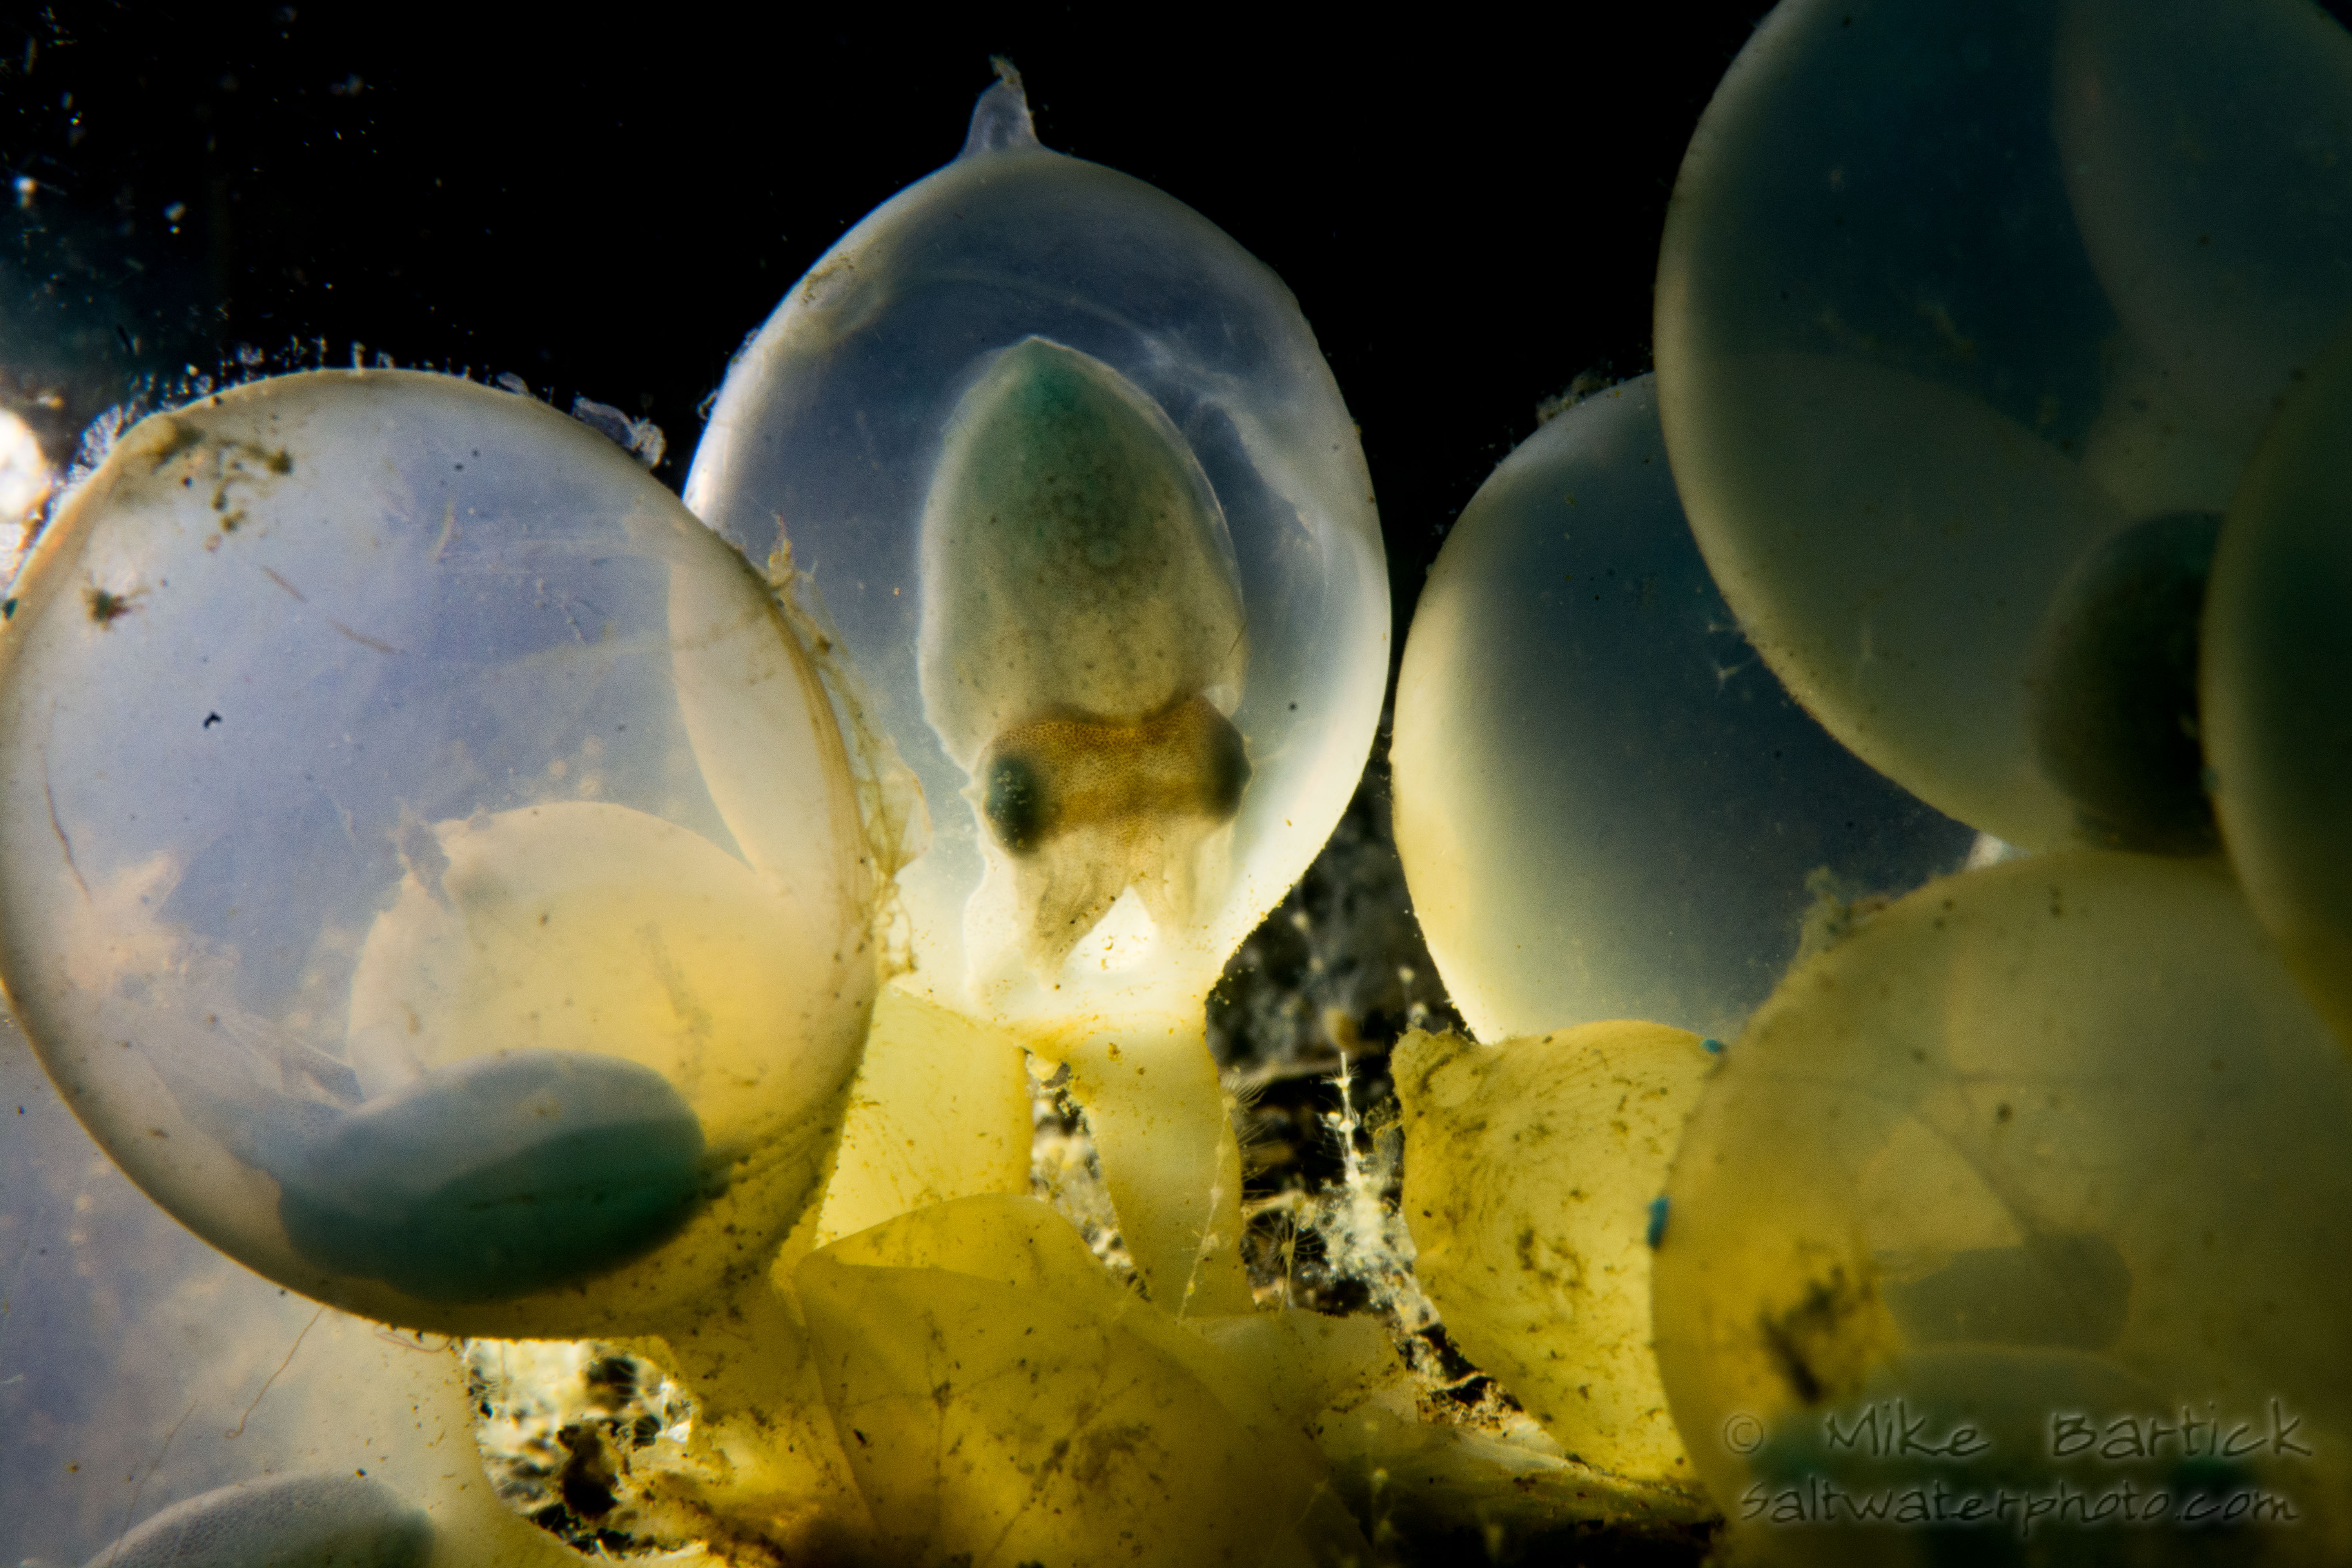
This is a technique where you “frame” your subject of interest inside of, or between, something else, in this case additional cuttlefish eggs. Again the rule of thirds is applied as my guideline.
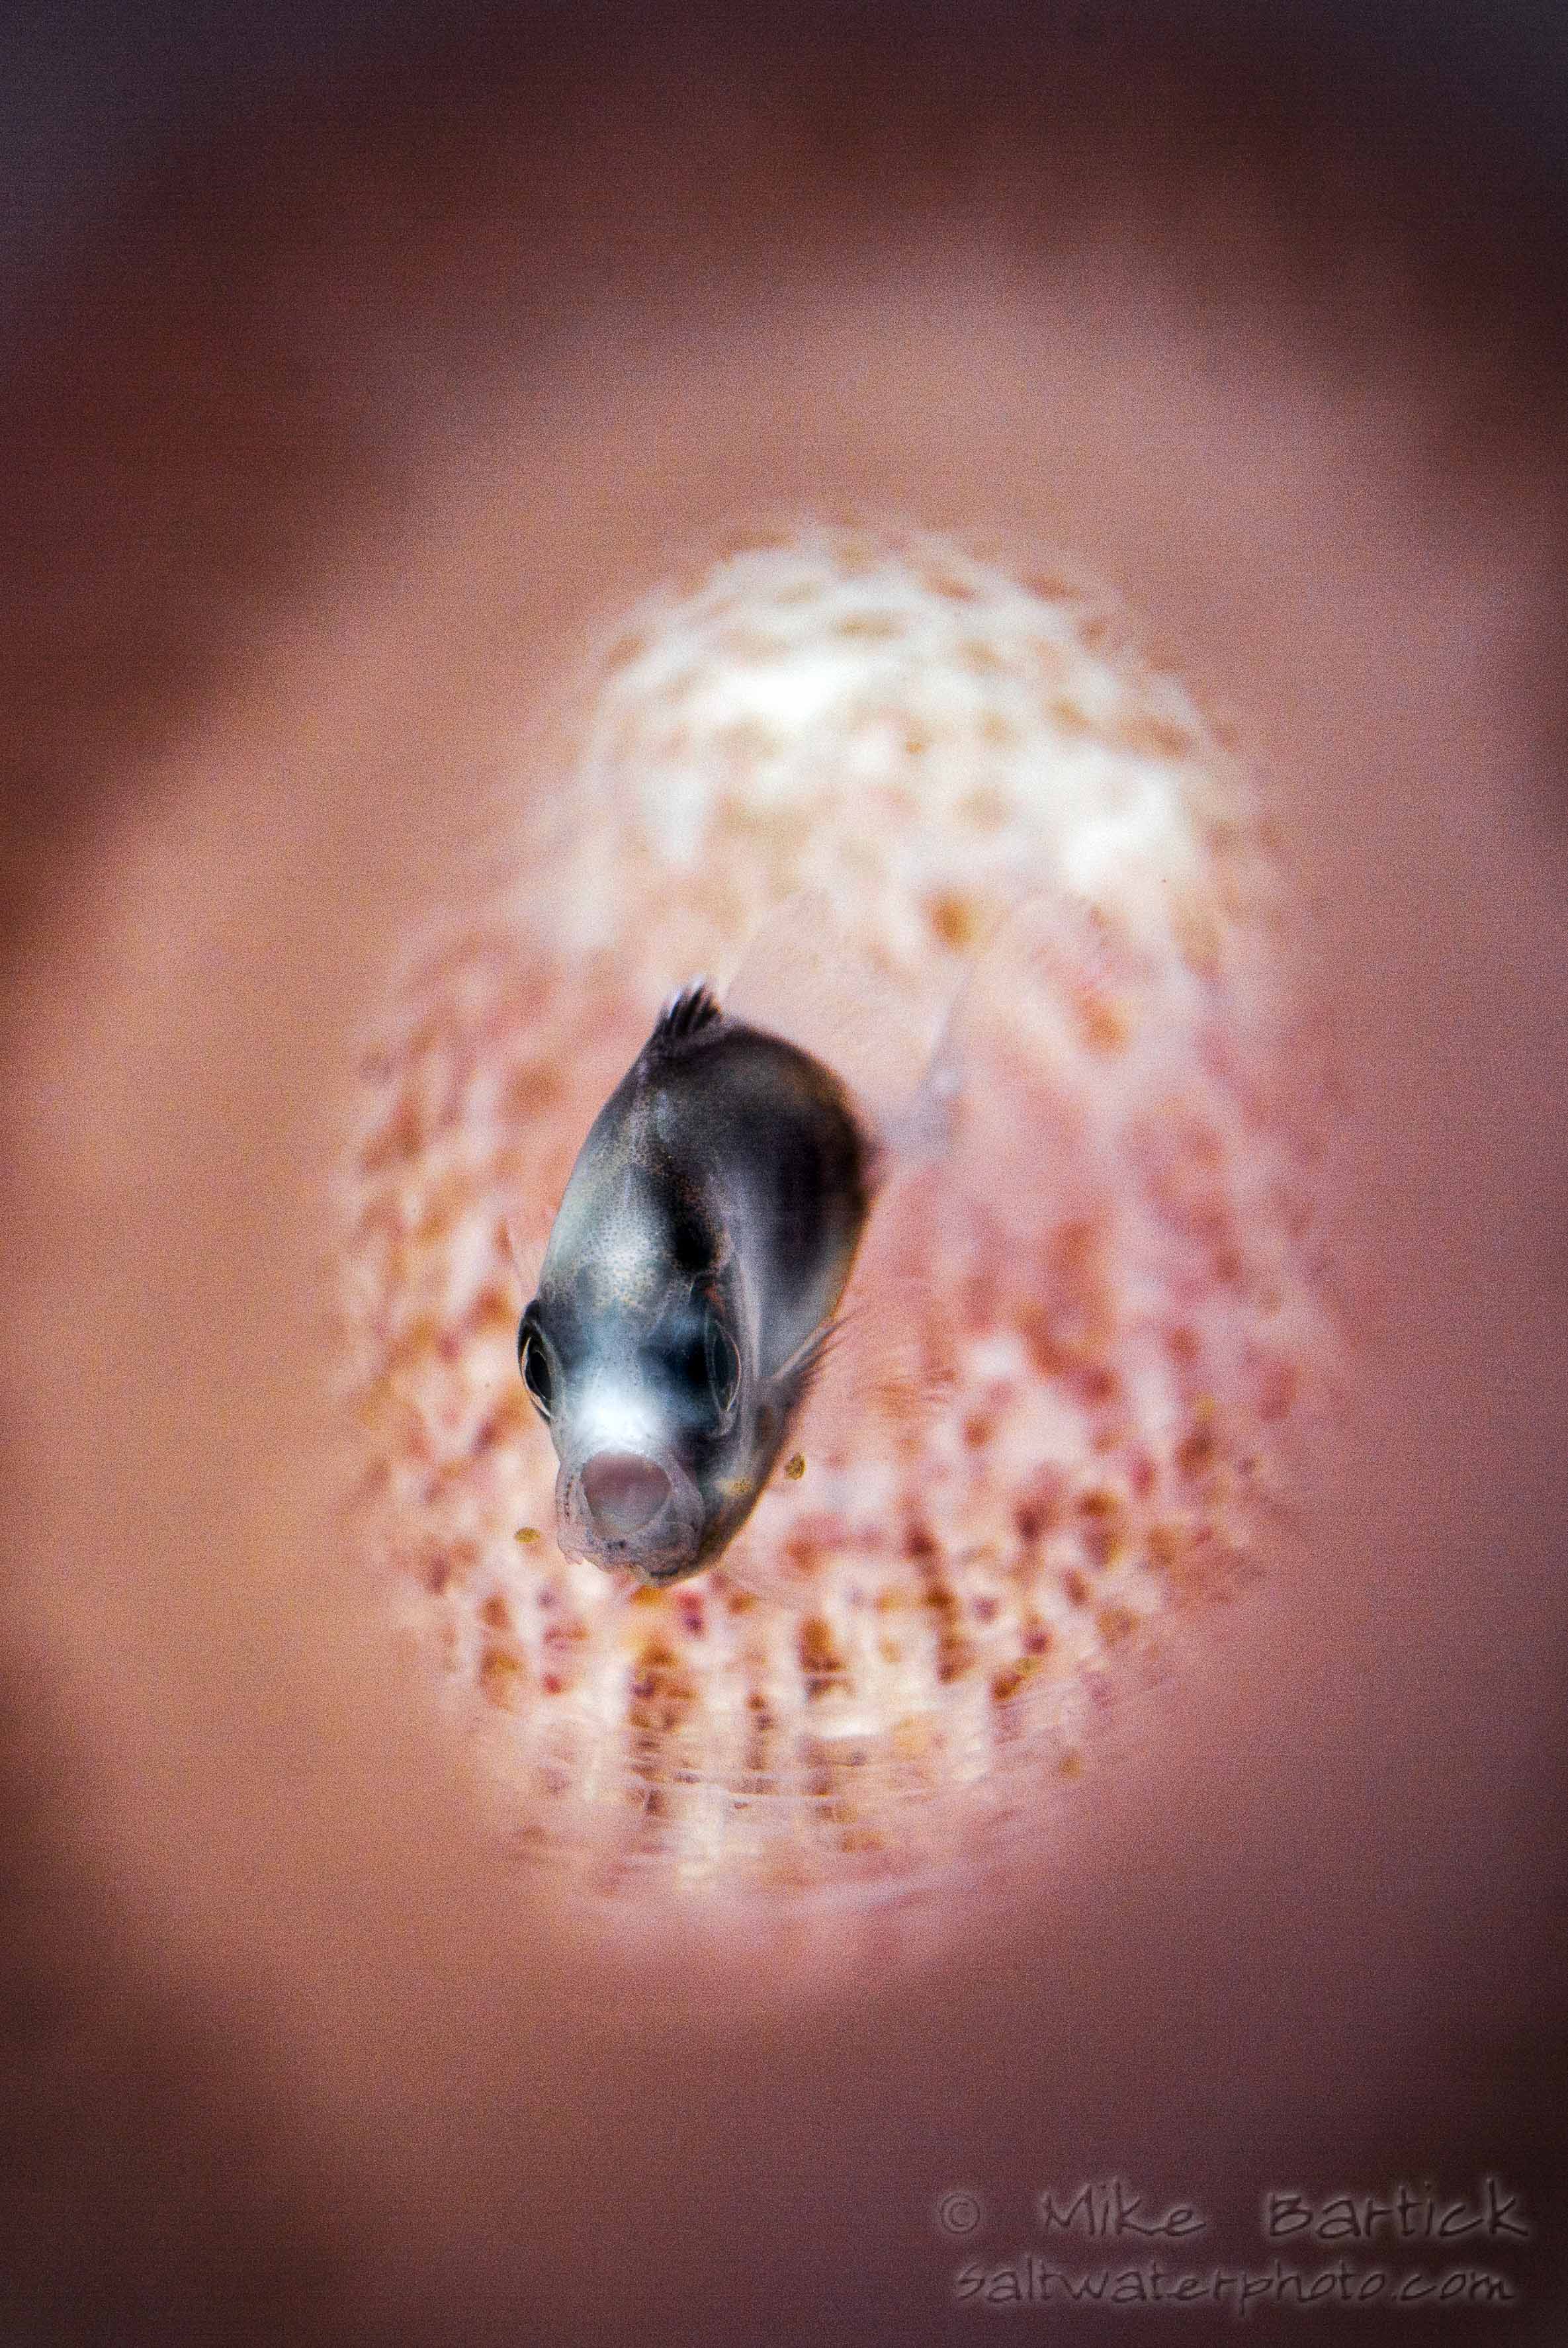
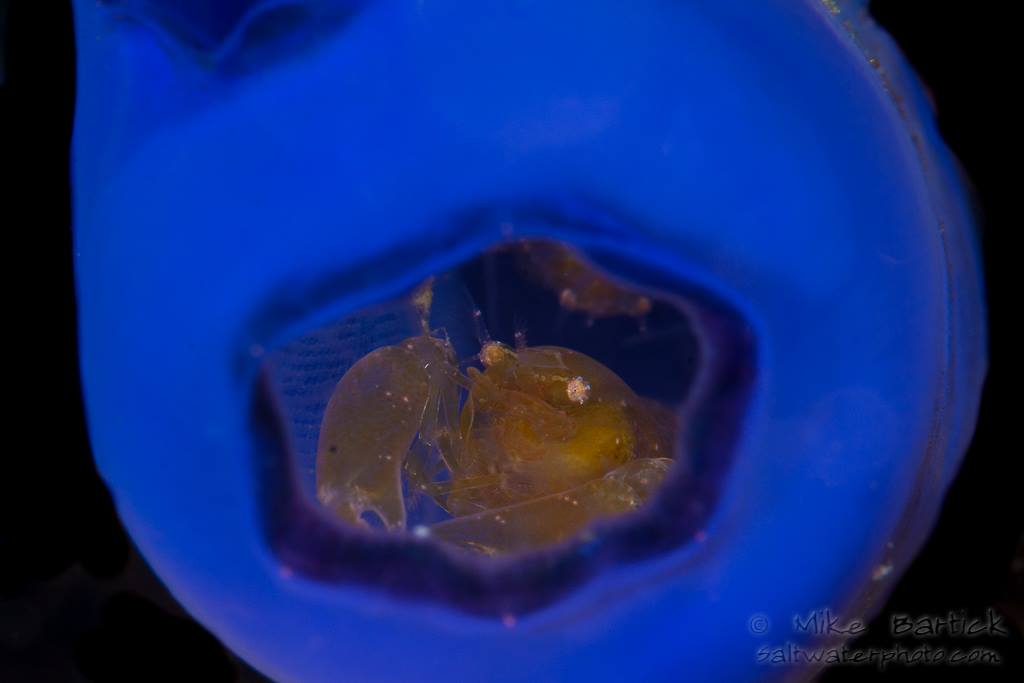
Another example of framing is something inside of another subject, like the juvenile trevally taking refuge inside of a pelagic colonial tunicate known as a Pyrosome. Or the snapping shrimp inside of a blue tunicate.
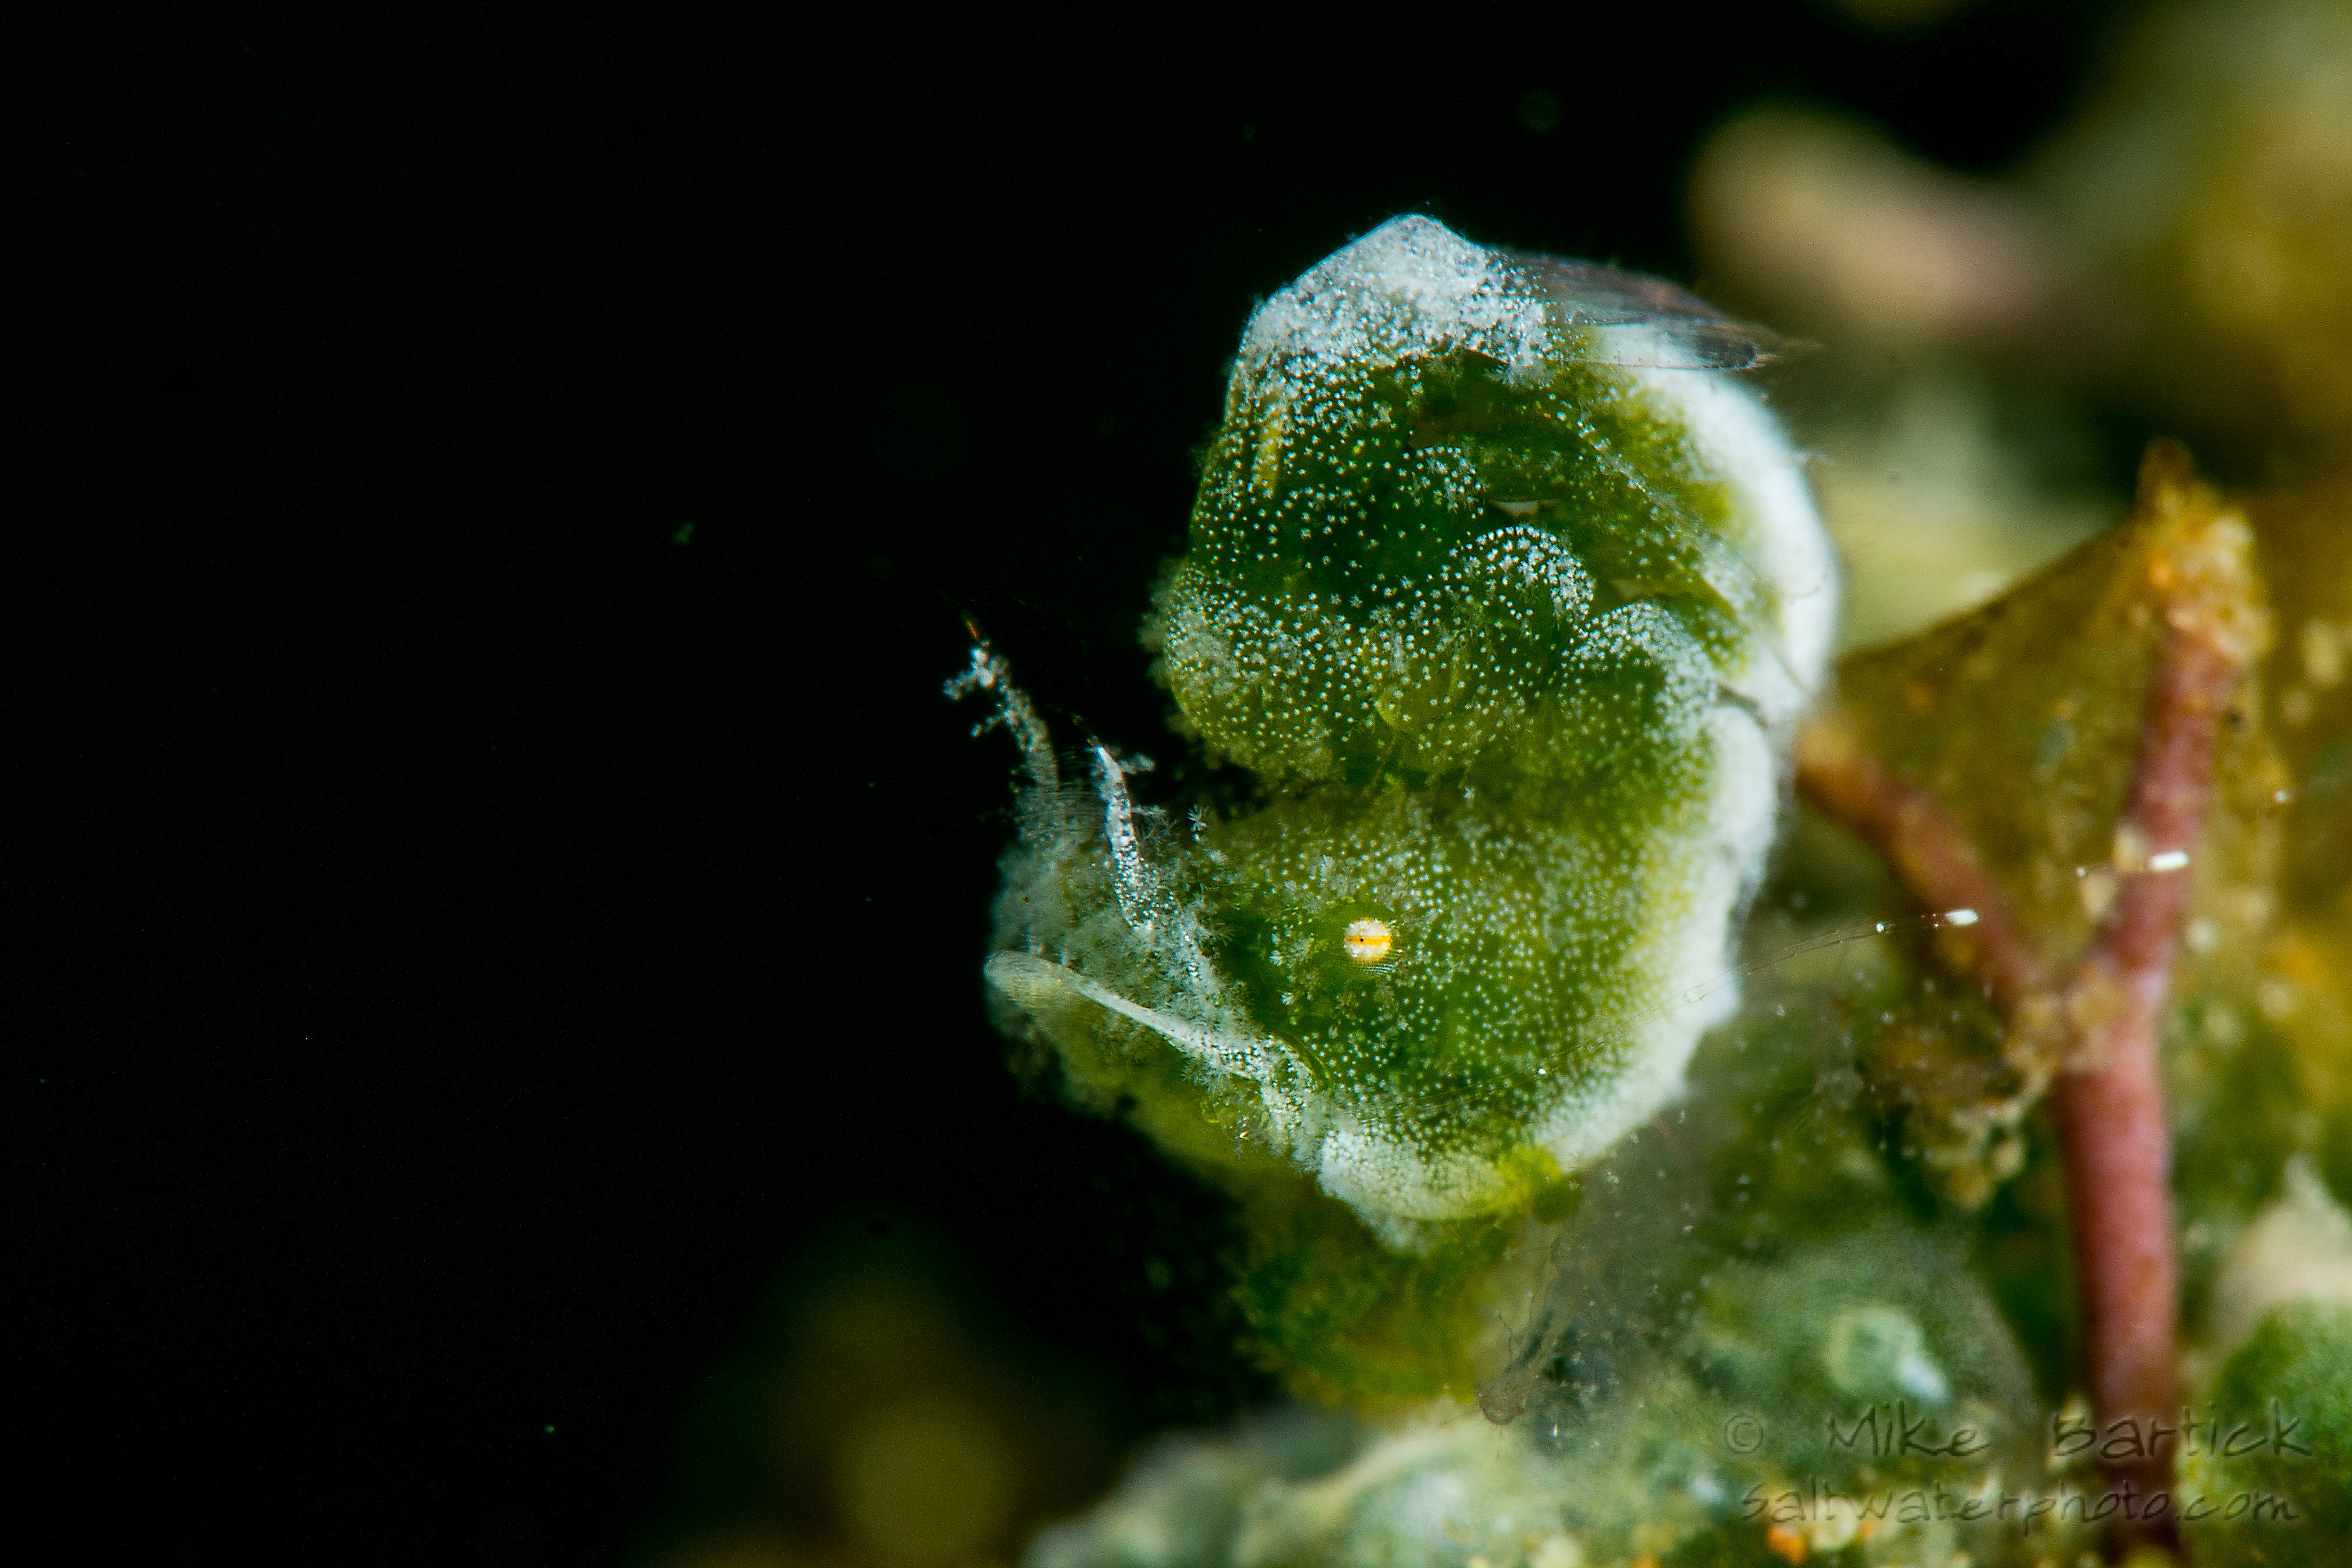
“Wasabi pea” hairy shrimp (Phycocarus sp.) make for great macro subjects and due to their size, perfect for the next example. Remember that sometimes it’s not what’s in the frame, but what’s left out of it. Often changing your approach to be sure that nothing is behind your subject when shooting the photo can eliminate much of the confusing background (image right). This is where a snoot is also highly effective. Negative space doesn’t always need to be black either. By using a slower shutter speed you can have a blue background or by using a lower F-stop, you could create lovely creative bokeh, so keep an open mind and an eye on design within the frame.
This is another signature technique that creates big robust images and can be done with a variety of lenses and subject matter from abstracts to medium-sized nudibranchs. I like bright, bold colours in my macro so this technique fills that role for both. Again using Photoshop or Lightroo
m you can learn how to adjust the image prior to shooting it.
Using these simple examples above, you should be able to gain a better grasp on the subject of composition and soon you will have crossed the bridge to stronger captures.
Most importantly, be kind to the environment and always have fun! Next up is shooting behaviour, so stay tuned for some crazy action shots.
In a tropical, oceanside setting, Crystal Blue Resort finally offers a finer quality of lodging perfectly placed to experience Anilao’s excellent scuba diving and underwater photography opportunities. Crystal Blue Resort is conveniently located in front of Arthur’s Rock Marine Sanctuary where scuba diving enthusiasts can have their once-in-a-lifetime underwater adventure.
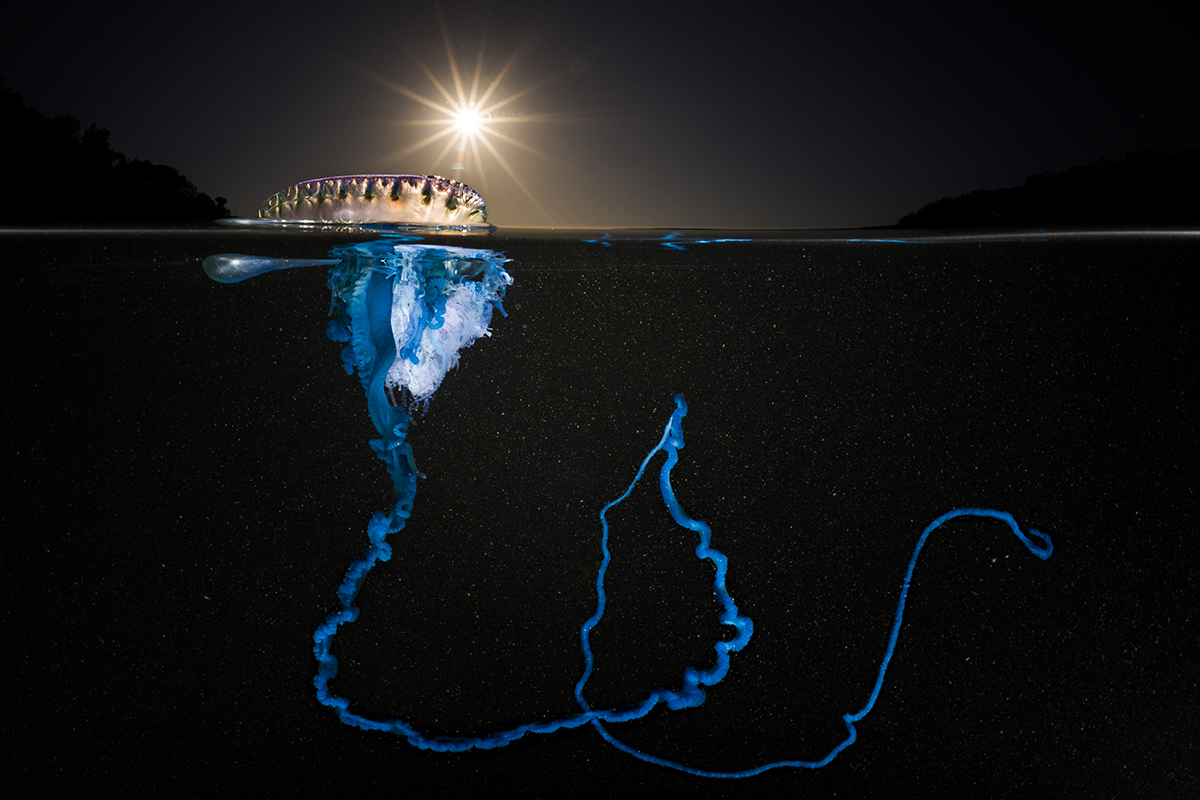
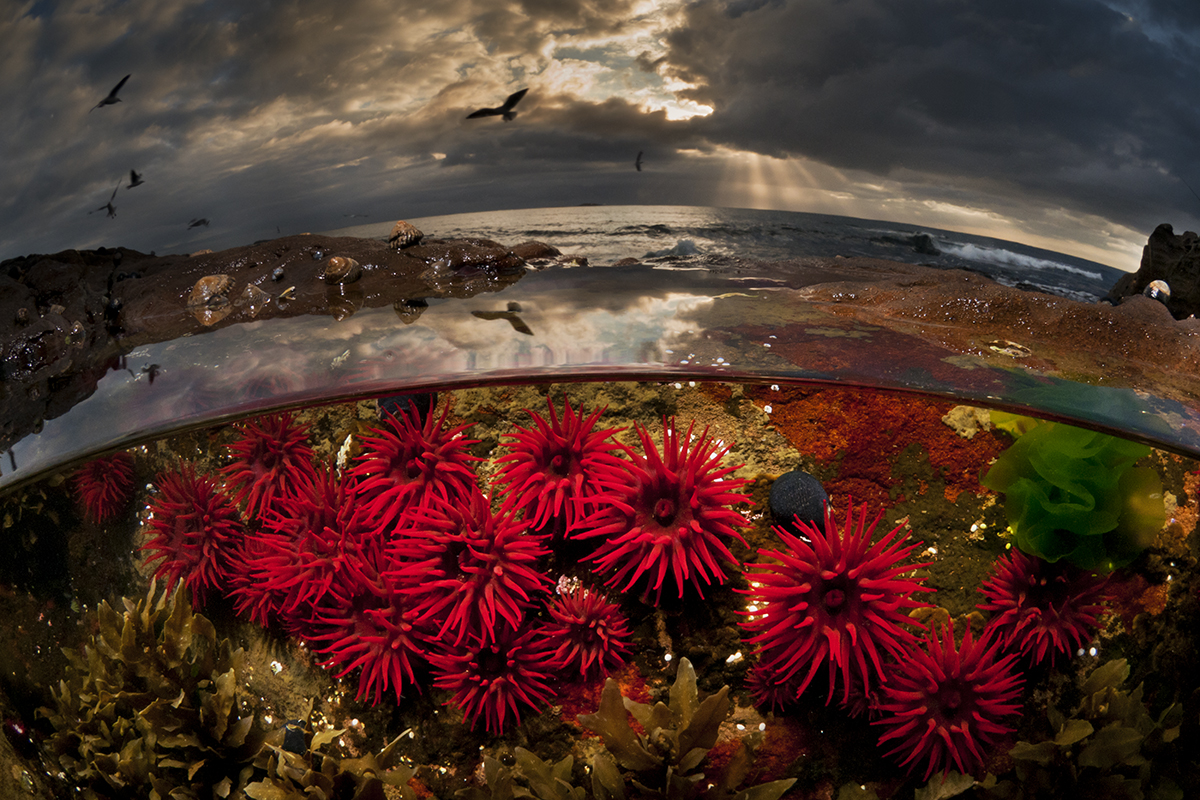
Famous for his unique over-under shots that have placed him on the front of Scuba Diver magazines – twice – and won him placings in numerous international competitions, UK born Matty Smith jumped from the cold European waters to Down Under in 2007 – all in the name of underwater photography.
A love born from snorkelling in the Mediterranean and observing the light dance below, underwater photography has allowed him to visually communicate to the viewer the majestic feelings of scuba diving and the incredible interactions he experiences with rare creatures in their natural habitat.
Artistically blending the topside world with the underwater one, Matty’s images remind us just how thin the line is between both realms. From beautifully lit jellyfish that peek above the surface, to squid poised like Medusa – his innate ability to transform the underwater world into something more alien than it already is, is one of the many reasons why he is our Underwater Photographer of this month. We caught up with Matty for a quick Q&A about his life, career and imagery:
What made you want to become an underwater photographer? I actually don’t remember an exact epiphany where I wanted to become an underwater photographer; it just kind of evolved over a number of years starting from when I was very young. I remember going on holidays to the Mediterranean Sea when I was a small child and not wanting to do anything but go snorkelling all day, every day! I never seemed to get tired of it. When I got a bit older and started travelling myself, I got a film SLR for my birthday for above-water ocean shots and I bought underwater disposable film cameras to try and record what I saw underwater, but quickly got frustrated with the quality from the disposables.
It was in my early twenties when I bought my first underwater SLR housing, an Ikelite for the Nikon F80 – that was the moment that I guess it got serious. But even then I couldn’t scuba dive and I mostly used it to shoot surfers in the waves and for snorkelling. A few years later, I got PADI certified during a trip to Tobago in the Caribbean and then in 2007 I emigrated to Australia, drawn by the warm and clear seas. Shortly after arriving in Australia was the point when my skills really started to escalate through regular diving, practice and experimentation. I was, and still am, like a kid in a sweet shop here. My approach to photography is now (mostly) to look at how someone else has photographed a subject well, and then try to expand upon that and add a little something else rather than copy it. I always try to be a little different when possible. David Doubilet’s work has probably been my biggest influence and driving force to personal improvement.
Your first underwater shot? I think my first underwater picture was a very ordinary photograph of the reef at Gili Trawangan Island in Indonesia in the late 90s. It was the first time I had ever snorkelled in tropical waters and I was totally awestruck. It’s just as you’d expect, very underexposed and flat, but it was my first step into a life-changing world.
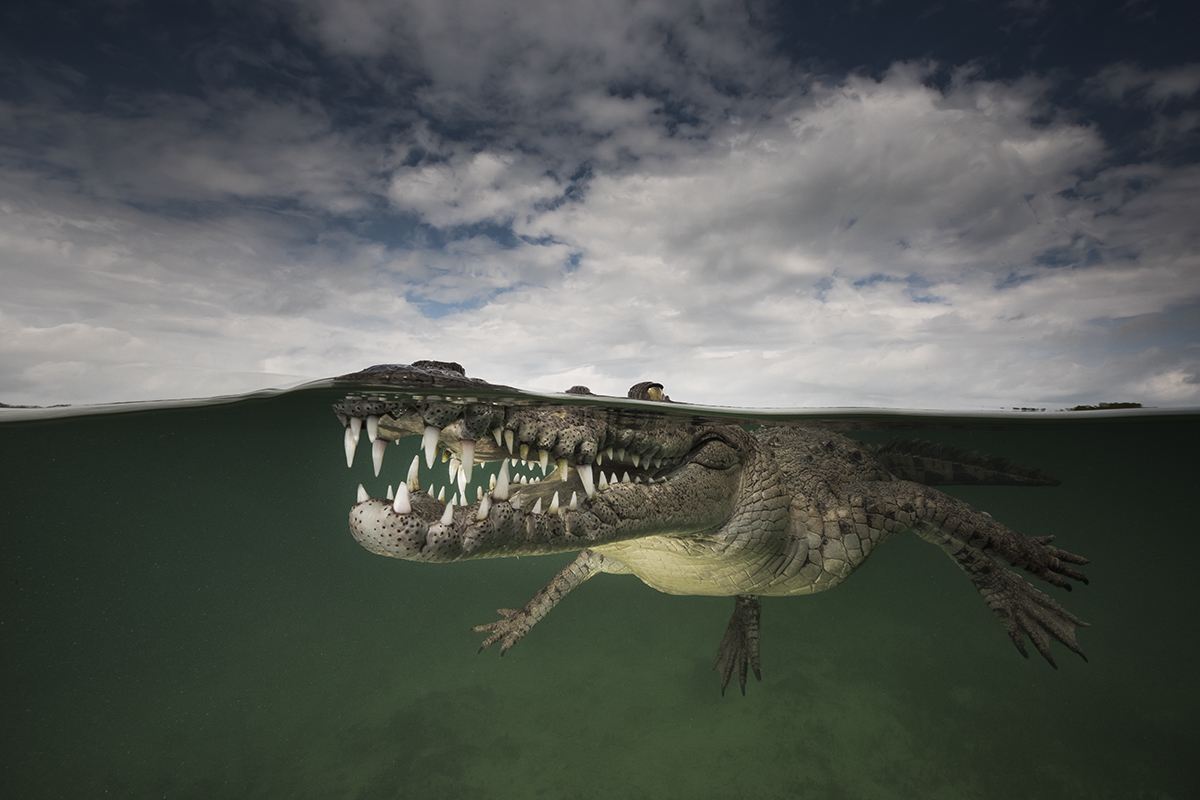
The story behind your most memorable underwater shot? So I’m in a shallow mangrove snorkelling in about two metres of water and looking at the business end of a wild 2.5-metre American saltwater crocodile through my viewfinder. Now, my photography has led me into a few interesting situations in the past, but what I see before me takes the cake. I’m staying as still as can be and mumbling to myself profusely, “Just get the shot!”
It all took place recently on an Ocean Geographic expedition to Jardines de la Reina (Gardens of the Queen) in Cuba. We were there to photograph these American saltwater crocs. I was a little nervous about it, but very excited. Whilst cruising the mangroves in the tender, a couple of crocs were spotted just under the surface along the vegetation line. Could this be my chance to get the perfect half over/half underwater image I had imagined?
The boat was brought to a stop and I gently eased my body and camera into the water and slowly finned my way over. Another photographer joined me and the rest stayed in the boat to keep a watchful eye for more crocs. I gingerly positioned myself as close as I dared to make my photograph.
Now it’s very seldom I remember the exact moment of pressing the shutter on “the shot of the day” but I do remember everything about this one: pulling focus, framing up, the sweat beading on my forehead and holding my breath. Confident I had my shot in a couple of frames, I slowly backed away and got back in the boat. Mind blown!
I named the image “Smiling Assassin” and it went on to be a multiple award-winning shot.
Where is your favourite dive destination? This question is too hard! I’m the biggest excitable grommet at heart when it comes to diving and my favourite destination is usually the last one I went to! You can always find something to excite and inspire underwater no matter where you are. Up there on the list would be Cuba, Papua New Guinea and the Solomon Islands, but I also really like the Sydney dive sites. Oh, I went to Anilao in the Philippines recently – that was pretty cool too.
The site you’d most like to dive, but never have? Too many to list! I recently crossed off Kimbe Bay, Papua New Guinea, from my list, though I will return – awesome place. I’m hoping to get to Socorro (Revillagigedo Islands) soon and also Fakarara (French Polynesia) for the grouper aggregation is a must do for me. I’d like to try some cold-water stuff too, maybe Antarctica soon. And of course how could I leave out the Sardine Run! So much to do, so little time!
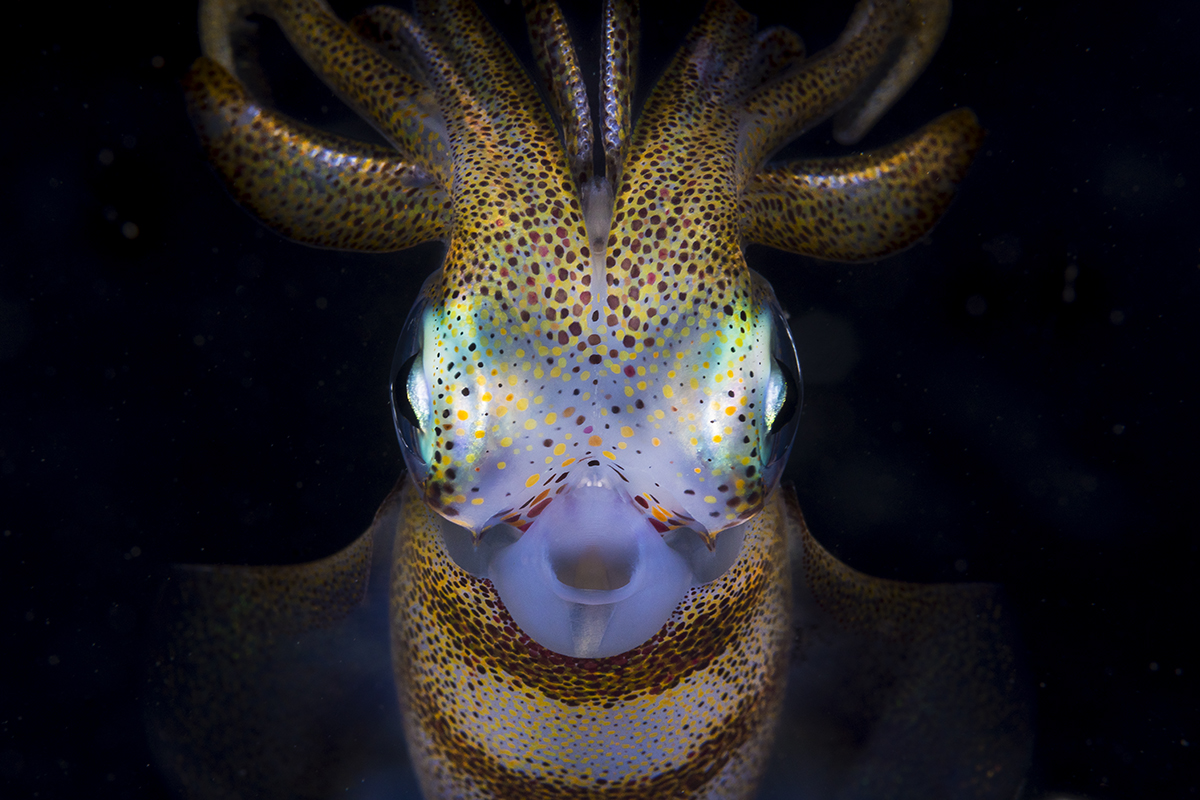
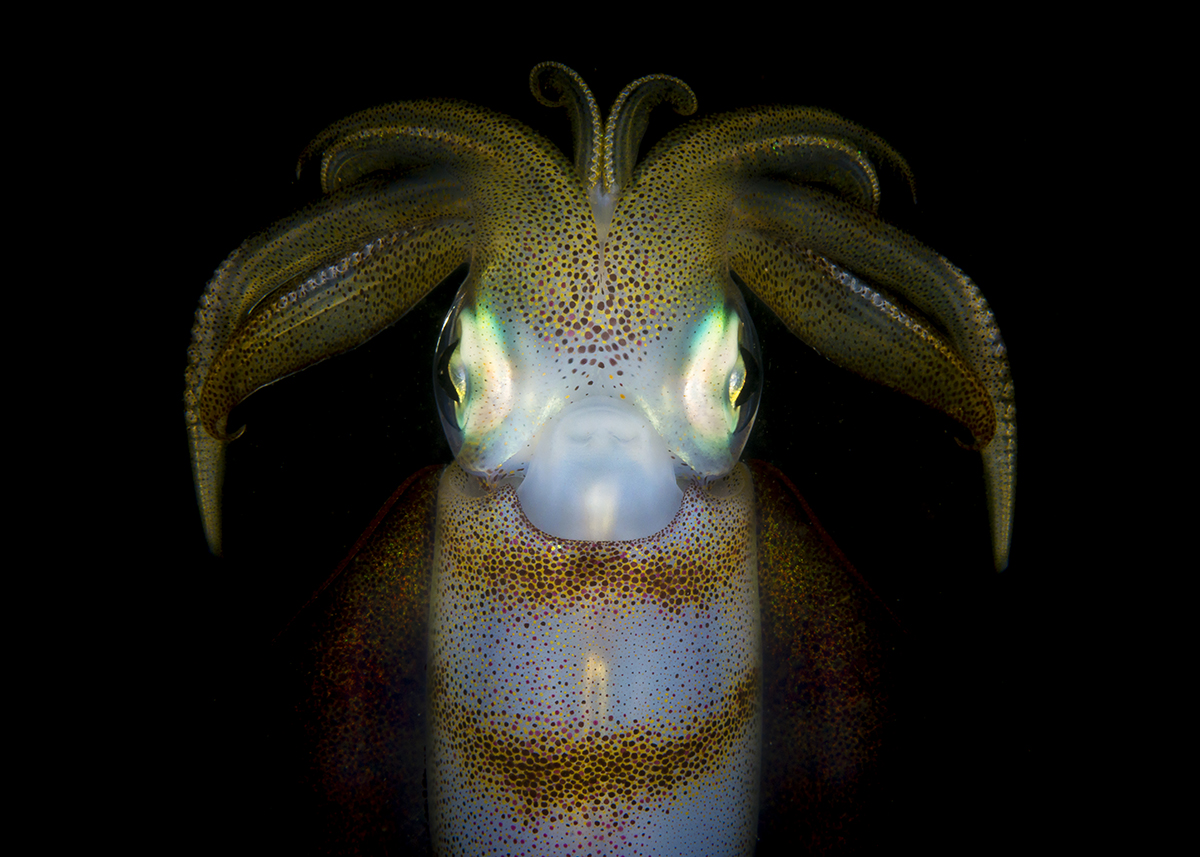
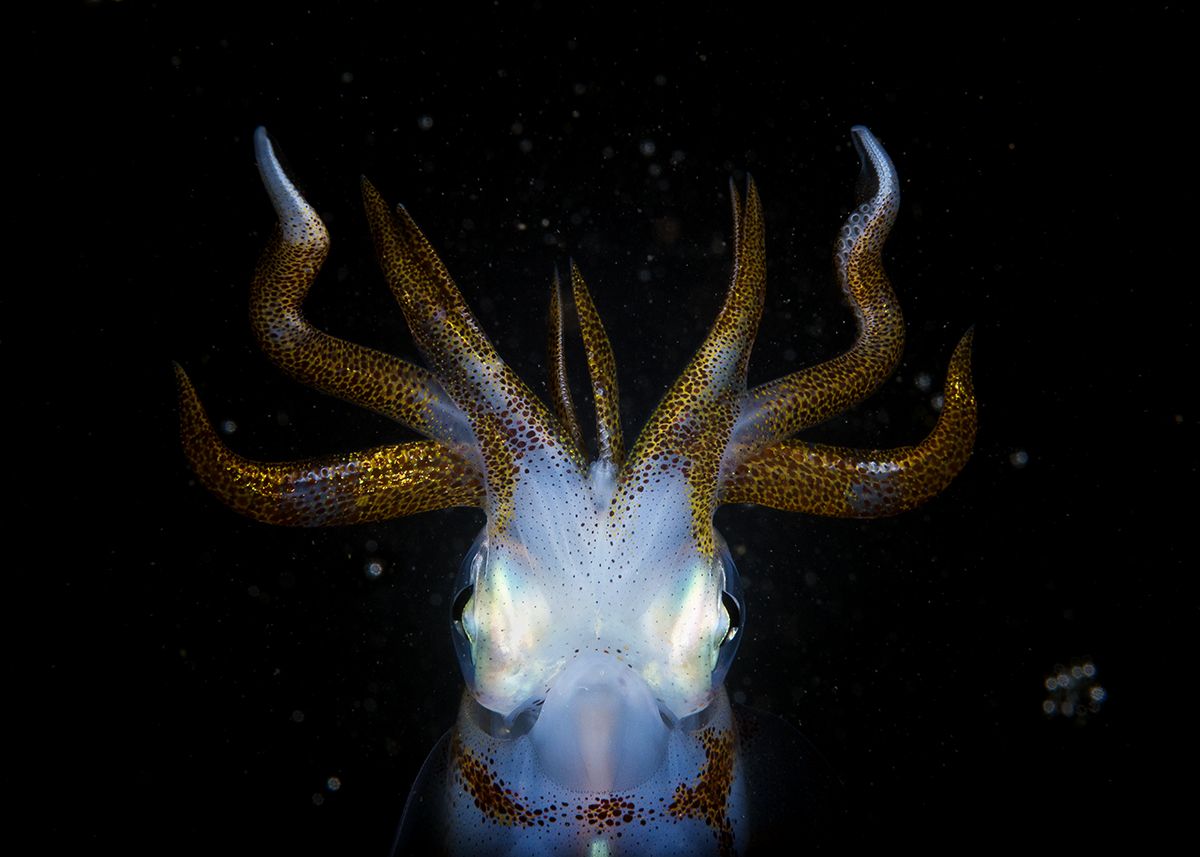
The weirdest thing you’ve seen underwater? Squid would have to be up there. I’m currently working on a portfolio of squid portraits, and their ability to alter shape, colour, pattern and apparent mood in less than a second has me mesmerised; it can do it much faster than a chameleon. Each one seems to have its own personality and in the little bay where I’m working on this collection of images, I think the local squid population have gotten quite used to me, they’re almost like little pets now and not timid around me at all.
What camera equipment are you currently using? I use a Nikon D810 mostly for my wide-angle work. My favourite lenses to use with it are my Nikkor 16–35mm f/4 VR and Nikkor 16mm f/2.8 Fisheye. Most of my over/under portfolio is shot with this camera and my Nikkor 14–24mm f/2.8. For macro I’m using a Nikon D7200 with 40mm f/2.8, 60mm f/2.8 and 105mm f/2.8 Nikkor Micro lenses. Everything gets housed into Aquatica Digital underwater housings and ports and I also use the Aquatica Digital +5 and +10 wet lenses for super macro. Strobes are Inon Z240’s.
What is the highlight of your career? That would have to be the period between August to October 2014. I was lucky enough to win the overall Australian Geographic Nature Photographer of the Year Award, also be a BBC Wildlife Photographer of the Year Prize winner and get 1st, 2nd and 3rd prizes from the Ocean Geographic Pictures of the Year. Stringing all that together in a short space of time opened a lot of doors for me and was just the springboard I needed to give my career a real boost.
…And the lowpoint? Drowning a brand new D810 camera that Nikon had given me to use at the very start of my sponsorship during an Ocean Geographic expedition to Cuba. It was totally my own fault for not checking my housing properly, coupled with a little bit of user error too. We were out in a little tiny boat surrounded by silky and reef sharks and I was far too excited. It was an awkward phone call back to Nikon head office, but they were surprisingly relaxed about it. Someone once said to me, and I really can’t remember who it was, “Underwater photographers can be categorised into those who have drowned cameras and those who are going to!”
Is there any particular shot that you still want to get? Something with lots of ice in it, an over/under of some description, throw in some penguins and a leopard seal too, that’s the picture.
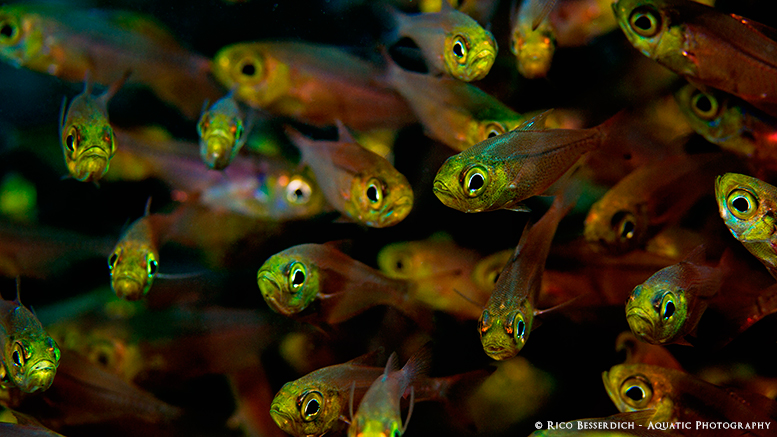
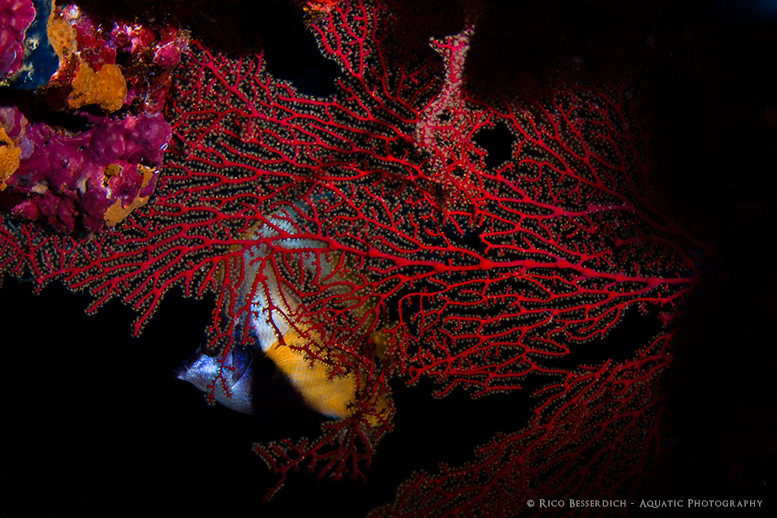
Professional underwater photographer Rico Besserdich takes us through the importance of developing the correct mindset for underwater photography, in this part one of his three part series
Is underwater photography difficult? Actually no – at least not more difficult than any other kind of photography. Each single part of creating an underwater photograph, seen separately from the rest, is not so tricky.
But the sum of all parts (and to master them) can be confusing sometimes. It is often believed that professional photographers do have their “special secrets” that make their shots differ from the rest, but mostly it’s just a question of following a proper mindset.
“A mindset is a habitual or characteristic mental attitude that determines how you will interpret and respond to situations.”
In terms of underwater photography, we can say that the mindset is a sort of systematic way that we follow to stay organised and get the best out of our photo dives.
So, if you, for example, run around your hotel room, searching for your housing’s O-ring four minutes before the departure of the dive boat, and at the same time are wondering about whether you’ve charged your strobe batteries or not (and where are those batteries?), you definitely could use a change of mindset!
Imagine you are planning to join a dive boat for two to three underwater photo dives tomorrow. Thinking about things before they happen, and not when they happen, is an important first step here.
Location
Before assembling all your photo gear, it might be a good idea to find out where you’re going to dive. Is the dive spot a macro spot or a wide-angle spot? Is there something special you plan to take photos of (such as special critters, a wreck, or something else)? Is it deep or shallow? How are the general light conditions, such as the position of the sun?
You can obtain this information from the dive centre, dive guide, or other photographers who have dived that place already, or even by doing a little research on the Internet.
Gathering this information will help you to choose the right configuration of your underwater photography equipment, such as the kind of lens, strobes, strobe-arms etc.
The ideal case, of course, would be that you’ve dived that place already before, and know what’s down there – maybe even taken some test shots to develop an idea – and are now going to dive there again and take the shot that you want. For underwater photography, it can be highly advantageous to dive the same place multiple times.
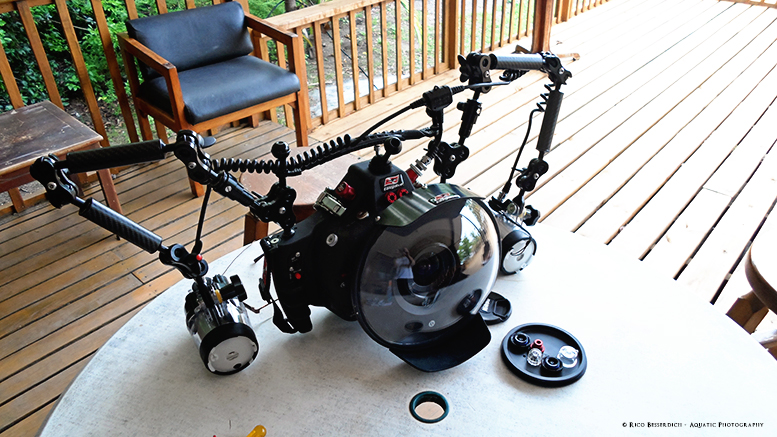
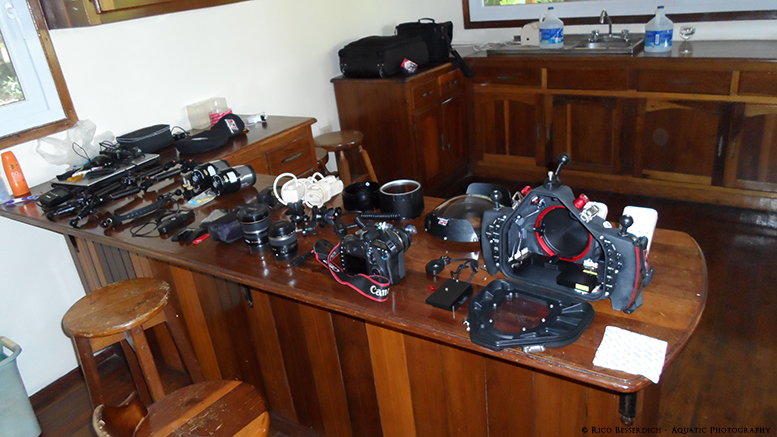
Now that we know what equipment/configuration we need, it’s time for the next step. Collect all necessary parts and place them on a clean, dry and dust-free place. This could be a table or even the bed in your hotel room.
Your collection will probably consist of:
Camera body
Camery battery
Lens
Memory card
Housing
O-ring(s)
Strobe(s)
Strobe battery
Strobe cable
Strobe arm(s), strobe clamps and other related accessories
Take your time and assemble your photography gear. Do this nicely and calmly, without any disturbance. Make sure that all batteries are charged (even the spare ones), the memory card is empty (or still has lots of free space), and all o-rings are smooth (lubricant) and clean.
Once this is all done (a quick job for compact cameras, but sometimes a bit skillful for D-SLR or mirrorless systems), do a few test shots to make sure that your camera and strobes are working correctly. If something is not working (e.g. the strobe is not firing), check again. Often it is about the cable connection or false camera/strobe settings.
Relax, as you are not going to dive in five minutes, you are going to dive tomorrow, and have plenty of time to get your gear ready. Store your prepared gear in a bag or box, and charge your spare batteries during the night. Go and enjoy a nice evening… or just dream of diving and photography.
The next morning, when getting ready to go for diving, you’ll only need five minutes for a final check. The final check is not really necessary, but it’ll make you feel better.
Quickly check that your spare parts (batteries, silicone lubricant, o-rings etc.) are in the box (or bag) and fully functional. Don’t forget your towel!
Remember to turn your camera and strobe off after the final check to save battery energy. You’ll turn them on just before entering the water.
Next week Rico continues his Mindset Development series, watch this space for part two!
The diver noticed a problem with his hose, but dived anyway. At nine metres his regulator hose ruptures and he is forced to make a free ascent. Let’s learn from his mistake: If it doesn’t look right, it probably isn’t right.
Reported Story
It was the second dive of the day. The first had been a wreck dive to 26 metres. This dive was to a 12 metre maximum depth. I was 10 minutes into the dive and had just come out of a tunnel about 30 seconds before this incident occurred.
My regulator hose ruptured at my mouthpiece when I was at nine metres. I was still able to breathe, but I surfaced because I was in a cloud of bubbles and couldn’t see anything. I’m not sure what I would have done if the rupture had occurred while I was still in the tunnel. Other divers in the group said that I shot up like a rocket. I exhaled the entire way up, but I still felt strange that night. My doctor examined me three days later after I arrived home; everything seemed to be OK.
The regulator belonged to me. When I inspected it before the trip, it looked like the rubber jacket of the hose was out of the bushing a little more on one side of the hose than the other. When there was no pressure in the hose it didn’t look bad, but with the tank turned on there was a big difference. I didn’t notice it when I was getting ready to jump into the water. My dive buddy took a picture at the beginning of the dive (see left), and you can see that the hose is at an angle where it connects to the second stage.
If I had more time I would have had the regulator overhauled, but I noticed the problem the night before the trip. I didn’t think it was a big deal then, but I do now.
DAN Comment
If it doesn’t look right, it is probably not right. Fix the problem when you spot it, do not leave it for another time. Luckily, this incident ended without injury. The diver was not too deep, and he was aware of the need to exhale during ascent. He also did not have any decompression obligations at that time. Had he been significantly deeper, or if he had a decompression obligation, this may have resulted in drowning, arterial gas embolism (AGE) or decompression sickness (DCS).
Check out this incredible offer from DAN Asia-Pacific and UW360:
1 YEAR DAN Asia-Pacific Membership + 1 YEAR Subscription to Scuba Diver AUSTRALASIA + OCEAN PLANET Want to get your hands on this package? Click here.
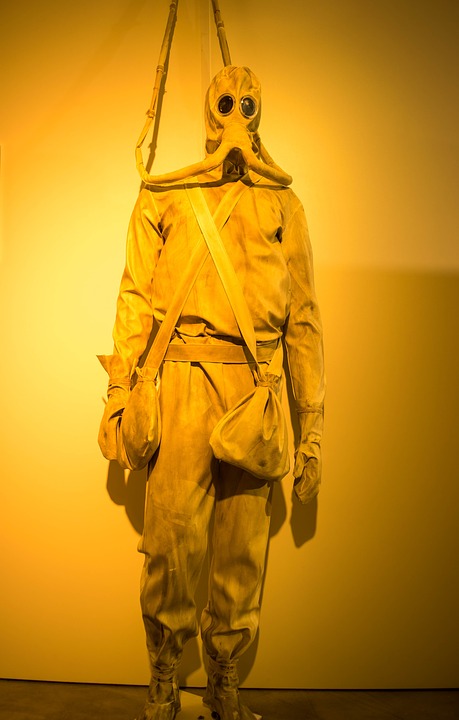
Those that glance over Leonardo da Vinci drawings and notes in the corner of library archive sections, or hear of his life at the back of history classrooms, will be aware of his desire to fill the sky – his bird-shaped ornithopter, or “aerial screw” which later became the design behind the modern helicopter – but few knew of his fascination for the world below the waves. An underwater army, clad in leather diving suits and set to march along the Venetian seabed to thwart any incoming invasions by sea, was an unmade da Vinci design that may have inspired the invention of the first scuba equipment – 300 years after his death.
Da Vinci’s drawings, which are ruffled with age and purposefully ambiguous (many believe that his notes were left incoherent so as to confuse those who wish to sinisterly “misuse” his designs), depict a diver outfitted in an apparent post-apocalyptic nuclear suit. It’s the suit of nightmares.
With a leather cloth, a protective face mask and goggles, the suit was attached to a long snorkel made of bamboo which ran up to the water’s surface. Da Vinci’s designs and inventions were made famous for being ahead of their time, and his breathing apparatus was one such example. Attaching the bamboo pipes together with sheepskin cloth to give them the flexibility to bend, da Vinci accounted for the effect of water pressure on the sheepskin “connectors” by placing large springs inside the cloth pipes to hold them open. This allowed the whole snorkel to bend and not collapse under pressure.
The snorkel was attached to a hollow cork diving bell on the surface, with a specialised cap on top to stop any water getting in. Da Vinci’s design also allowed the diving bell to be pulled underwater, turning it into a compressed-air diving system. Surface air could also be delivered to the diver from the people above with a bellow. An alternate drawing shows his diver breathing from makeshift air bladders, which is vaguely reminiscent of the later-developed oxygen supply tanks. Interestingly, both drawings had the diving soldiers carrying urine collection bottles in order to remain underwater for an extended period of time.
Another element of the da Vinci scuba gear design was to have an air balloon fitted to the face mask that could be regulated by a valve, enabling the diver to inflate or deflate the chamber to surface or sink in the water.
A forgotten army
Perhaps unsurprisingly, the Venetian Army was not impressed with da Vinci’s presentation of what seemed a radical invention, and his weapon of war – his underwater army – never properly surfaced. Instead, it was left to future generations to be inspired by da Vinci’s design and turn it into a breathing apparatus used passionately by millions.


 This article, by marine biologist Neil Garrick-Maidment, originally featured in Asian Diver’s “The Big Blue Book”. Find out more about Neil’s work and career


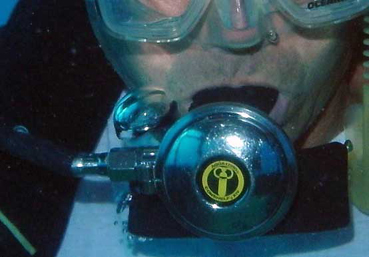 The regulator belonged to me. When I inspected it before the trip, it looked like the rubber jacket of the hose was out of the bushing a little more on one side of the hose than the other. When there was no pressure in the hose it didn’t look bad, but with the tank turned on there was a big difference. I didn’t notice it when I was getting ready to jump into the water. My dive buddy took a picture at the beginning of the dive (see left), and you can see that the hose is at an angle where it connects to the second stage.